Assignment Management
Tardiness Policy
Overview
Navigation 
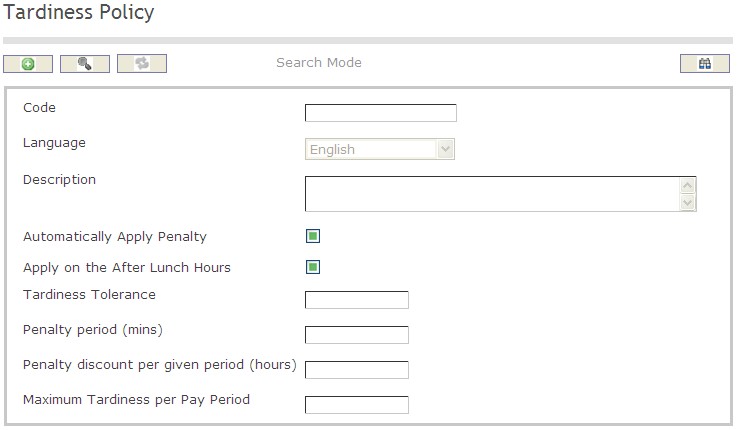
How to SEARCH:
- Enter the information to be used as retrieval criteria in the appropriate field (s). If you prefer to see a list of all tardiness policies, leave all fields blank
- Click on the Find icon

The Tardiness Policy screen includes the following fields:
| Field | Definition |
Code | Unique identification code describing the tardiness policy |
| Language | Language used |
| Description | Description of the Tardiness Policy |
| Apply on the After Lunch Hours | When checked it applies the tardiness policy on the work hous after lunch time |
| Tardiness Tolerance | The number of minutes allowed before the employee is considered late for the job |
| Penalty Period (mins) | The number of minutes deducted from the employee work hours |
| Penalty Discount | The number of hours deducted from the employee work hours |
| Maximum Tardiness per Pay Period | Describes the maximum number of times the employee is allowed to be late during a pay period |
Create A Tardiness Policy
To Create a Tardiness Policy on late assigned shift schedules, follow the steps below:
Navigation 
By default, you will be in Search Mode.
1. Click on the New icon ![]() . You will then be in Insert Mode.
. You will then be in Insert Mode.
2. Enter the new Tardiness Policy information. Fields with an asterisk  are mandatory fields.
3. Enter the Code, select the Language from the drop down menu, and type in the Tardiness Policy Description if any.
- Code: Tardiness Policy unique identification code
- Language: Language used
- Description: Description of the Tardiness Policy
4. Check the Automatically Apply Penalty to apply a penalty on tardiness on Time Recording.
5. Check the Apply on the After Lunch Hours to apply the tardiness policy when the employee comes back to work late after the lunch break.
6. Enter the Tardiness Tolerance, which is, the number of minutes allowed before the employee is considered late for the job.
7. Enter the Penalty Period (mins), which is the period expressed in minutes to which the penalty applies.
8. Type in the Penalty Discount, which is the penalty to be applied when tardiness has oocurred, expressed in regular hours rate.
9. Enter the Maximum Tardiness per Pay Period as required.
- The Maximum Tardiness per Pay Period describes the maximum number of times the employee is allowed to be late during a pay period. If this number is exceeded by the employee a notification is sent to the HR Manager and the Employees Manager.
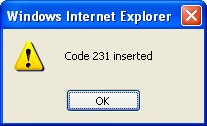
10. Click on the Save icon  at the bottom to save your new Tardiness Policy information. A window will appear to confirm the new Tardiness Policy creation. Click OK to confirm, and message will be displayed showing the code was inserted,
Delete A Tardiness Policy
To Delete a Tardiness Policy on late assigned shift schedules, follow the steps below:
Navigation 
By default, you will be in Search Mode.
- Find the Tardiness Policy you want to Delete
- Enter the information to be used as retrieval criteria in the appropriate field(s). If you prefer to see all Tardiness Policies, leave all fields blank.
- Click Find
 .
. - Select the Tardiness Policy you want to Delete.
- Click on the Delete icon
 .
. - A window will appear asking you to confirm

4. Click OK to confirm and delete the Tardiness Policy
5. A window will be displayed confirming the Tardiness Policy has been deleted 
To Verify that the Tardiness Policy has been Deleted:
- Click on the Search icon

- Enter the Tardiness Policy information in the appropriate field (s).
- Click on the Find icon

- This window will appear

Modify A Tardiness Policy
To Modify a Tardiness Policy on late assigned shift schedules, follow the steps below:
Navigation 
By default, you will be in Search Mode.
- Enter the information to be used as retrieval criteria in the appropriate field (s). If you prefer to see a list of all Tardiness Policies, leave all fields blank.
- Click on the Find icon
 .
. - Click on the Tardiness Policy Field you want to modify.
You will then be in Update/Delete Mode. - Make the necessary modification(s).
- Click on the Update icon
 at the bottom of the screen to save your modifications. A window will appear to confirm the modification. Click OK to confirm.

Overtime Policy
Overview
The Overtime Policy represents a policy that is used when the employee work hours exceed the maximum hours allowed per work period. The overtime policy varies depending on the organization's set guidelines. For example, if a company allow employees to work 44 hours with regular pay, any hours that the employees work after the 44th hour is considered an overtime work period and the overtime policy applies.
Navigation
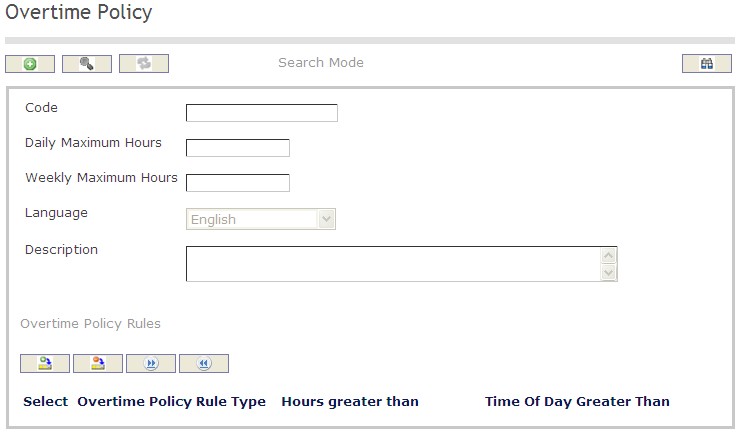
How to SEARCH:
- Enter the information to be used as retrieval criteria in the appropriate field (s). If you prefer to see a list of all tardiness policies, leave all fields blank
- Click on the Find icon

The Overtime Policy screen includes the following fields:
| Field | Definition |
Code | Accumulated Benefit unique identification code |
| Daily Maximum Hours | Daily Maximum of Hours |
| Weekly Maximum Hours | Weekly Maximum of Hours |
| Description | Description of the Overtime Policy |
| Overtime Policy Rules | Guidelines set by the organization regarding overtime policies |
Create An Overtime Policy
To Create an Overtime Policy when the employee work hours exceed the maximum hours allowed per work period, follow the steps below:
Navigation
By default, you will be in Search Mode.
- Click on the New icon
 . You will then be in Insert Mode.
 - Enter the new Overtime Policy information. Fields with an asterisk
 are mandatory fields.
 - Enter the Code, the Daily Maximum Hours, and the Weekly Maximum Hours in the fields provided.
- Code: Accumulated Benefit unique identification code
- Daily Maximum Hours: Daily Maximum of Hours
- Weekly Maximum Hours: Weekly Maximum of Hours
4. Choose the Language from the drop down menu.
5. Enter the Description of the Overtime Policy in the description field.
6. Click on the New icon  under
under  to enter the Overtime Policy Rules (refer to Overtime Policy Rules for more information).
7. Click on the Save and Return icon  to save the Policy Overtime Rules information and return to the Overtime Policy, or click on the Discard icon
  to discard the Overtime Policy Rules entry and return to the Overtime Policy.
8. Click the individual Select Checkbox (es), under Overtime Policy Rules to select and de-select the Overtime Policy Rule (s), as required, or click the Select All icon  or Unselect All
  icon, to select or de-select all Overtime Policy Rules (s), if required.
9. Click the Remove icon  to remove the selected Overtime Policy Rules,if required
10. Click on the Save icon  at the bottom to save your new Overtime Policy information. A window will appear to confirm the new Overtime Policy creation. Click OK to confirm.
Overtime Policy Rules
Navigation (From click the New Icon
 under
under  )
)
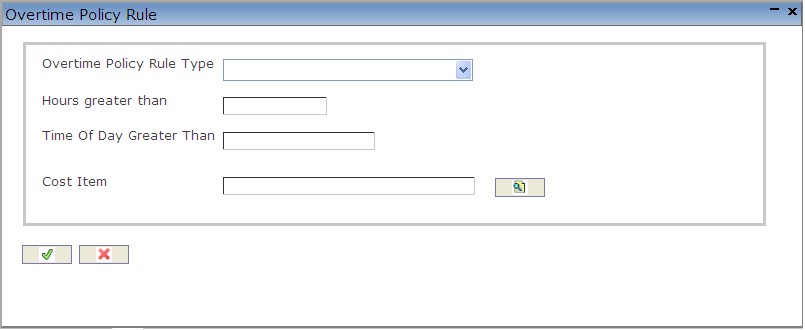
Create An Overtime Policy Rule
To Create an Overtime Policy Rule when the employee work hours exceed the maximum hours allowed per work period, follow the steps below:
Navigation (From click the New Icon
 under
under  )
)
1. Enter the new Overtime Policy Rule information. Fields with an asterisk  are mandatory fields.
2. Choose the Overtime Policy Rule Type from the drop down menu.
3. Fil in the Hours greater than and the Time Of Day Greater Than fields as required.
4. Click on the Lookup icon  to enter a Cost Item. Refer to Cost Item for more information.
5. Click on the Save and Return icon  to save the Overtime Policy Rule and return to the Overtime Policy, or click on the Discard icon
  to discard the Overtime Policy Rule entry and return to the Overtime Policy.
Delete An Overtime Policy
To Delete an Overtime Policy when the employee work hours exceed the maximum hours allowed per work period, follow the steps below:
Navigation:
By default, you will be in Search Mode.
- Find the Overtime Policy you want to Delete
- Enter the information to be used as retrieval criteria in the appropriate field(s). If you prefer to see all Overtime Policy, leave all fields blank.
- Click Find
 .
. - Select the Overtime Policy you want to Delete.
- Click on the Delete icon
 .
. - A window will appear asking you to confirm

- Click OK to confirm and delete the Overtime Policy.
- A window will be displayed confirming the Overtime Policy has been deleted

To Verify that the Overtime Policy has been Deleted:
- Click on the Search icon

- Enter the Overtime Policy information in the appropriate field (s).
- Click on the Find icon

- This window will appear

Modify An Overtime Policy
To Modify an Overtime Policy when the employee work hours exceed the maximum hours allowed per work period, follow the steps below:
Navigation:
By default, you will be in Search Mode.
- Enter the information to be used as retrieval criteria in the appropriate field (s). If you prefer to see a list of all Overtime Policies, leave all fields blank.
- Click on the Find icon
 .
. - Click on the Overtime Policy you want to modify.
You will then be in Update/Delete Mode. - Make the necessary modifications. To add or remove Overtime Policy Rules, refer to Overtime Policy Rules.
- Click on the Update icon
 at the bottom of the screen to save your modifications. A window will appear to confirm the modification. Click OK to confirm.

Promotion Policy
Overview
This screen holds the HR promotion policies for a given Employee Position.
Navigation 
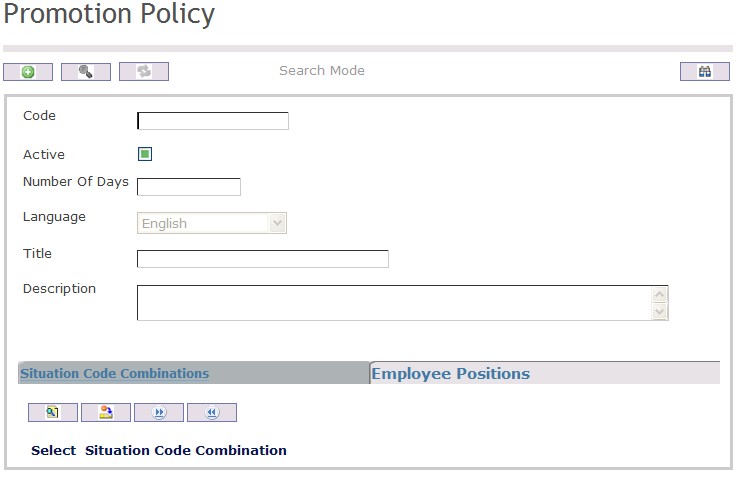
Create A Promotion Policy
Navigation 
By default, you will be in Search Mode.
- Click on the New icon
 (you will then be in Insert Mode).
 - Enter the new Promotion Policy information. Fields with an asterisk
 are mandatory fields.
 - Enter the Code, click on the Active checkmark, as required, the Number Of Days and select the Language, as required.
- Code: Unique identification code of the skill.
- Active: Active Status - if checked, Skill is available.
- Number Of Days: Minimum number of days a person is in the Employee Position before the Promotion policy can be applied.
4. Enter the Title, which is the name of the policy.
5. In Description, enter a detailed description of the policy
To ADD Employee Positions to Promotion Policy, if required:
- Click on Lookup icon
 , and enter the Employee Positions information, or leave the Employee Positions information blank to retrieve all Employee Positions.
 - Click Find icon

- Click the individual Select Checkbox (es) to select and de-select the Employee Position(s), as required.
- Repeat steps 1, 2 and 3 for all required Employee Positions .
- Click the Return icon
 to return to the Promotion Policyscreen, or click the Discard button
  to discard the selection entry and return to Skill.
 - Click the individual Select Checkbox (es) to select and de-select the Employee Position(s), as required, or click the Select All icon
 or Unselect All
  icon, to select all Employee Positions or de-select all Employee Positions , if required.
 - Click the Remove icon to remove the selected Employee Positions information, if required.
8. Click on the New icon  under
under  to enter the Situation Code Combinations (refer to Situation Code Combinations for more information), if required.
9. Click on the New icon  under
under  to enter the Employee Positions (refer to Employee Positions for more information), if required.
Click on the Save icon  at the bottom of the Promotion Policy to save your new Promotion Policy information. A window will appear to confirm.
Delete A Promotion Policy
Navigation 
By default, you will be in Search Mode.
- Find the Promotion Policy you want to Delete
- Enter the information to be used as retrieval criteria in the appropriate field(s). If you prefer to see all Promotion Policies , leave all fields blank.
- Click Find

- Select the Promotion Policy you want to Delete
- Click on the Delete icon

- A window will appear asking you to confirm
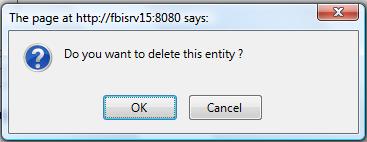
- Click OK to confirm and delete the Promotion Policy .
- A window will be displayed confirming the Promotion Policy has been deleted
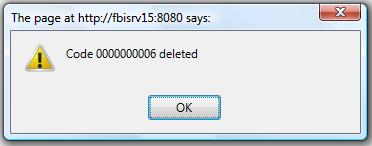
- Click on the Delete icon
To Verify that the Promotion Policy has been Deleted:
- Click on the Search icon

- Enter the Promotion Policy information
- Click on the Find icon

The window will appear 
Modify A Promotion Policy
Navigation 
By default, you will be in Search Mode.
- Enter the information to be used as retrieval criteria in the appropriate field(s).
If you prefer to see the list of all Promotion Policy, leave all fields blank. - Click on the Find icon
 . The list of Promotion Policies meeting the retrieval criteria will appear.
 - Click on the Promotion Policy you want to modify.
You will then be in Update/Delete Mode. - Make the necessary modification(s).
Click on the Update icon
 at the bottom of the screen to save your modifications. A window will appear to confirm the modification. Click OK to confirm.
Shift Schedule Definition
Overview
Shift Schedule Definition is used to organize shift hours with the number of working days per week. HR managers can associate overtime policies and tardiness policies to Shift Schedules and define the work hours and work days of each Shift Schedule.
Navigation 
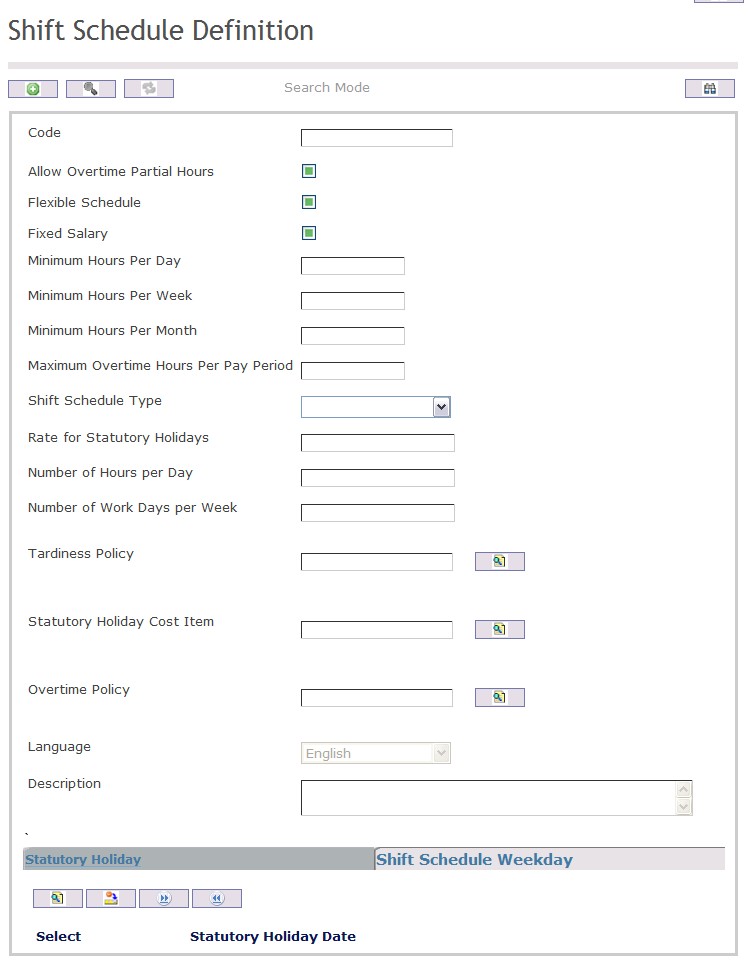
How to SEARCH:
- Enter the information to be used as retrieval criteria in the appropriate field (s). If you prefer to see a list of all Shift Schedule Definition, leave all fields blank
- Click on the Find icon

The Shift Schedule Definition screen includes the following fields:
| Field | Definition |
Code | Shift Schedule unique identification code |
| Allow Overtime Partial Hours | Specifies whether this shift schedule definition accepts partial hours to be paid on overtime or not |
| Flexible Schedule | Specifies whether this shift schedule definitions accepts flexibility on schedule or not |
| Fixed Salary | This is to indicate if the employee gets paid a fixed salary independent of the fact that there is 21 days in a month or 22 days |
| Minimum Hours Per Day | Specifies the minimum hours per day that must be fulfilled |
| Minimum Hours Per Week | Specifies the minimum hours per week that must be fulfilled |
| Minimum Hours Per Month | Specifies the minimum hours per month that must be fulfilled |
| Maximum Overtime Hours Per Pay Period | Specifies the maximum overtime hours allowed to be paid for the pay period |
| Shift Schedule Type | Can be on a 'Weekly' or 'Per Pay Period' basis |
| Rate for Statutory Holidays | Rate to apply to statutory holidays per Schedule Definition |
| Number ' | |
| Policy | The tardiness policy to be applied for this shift schedule definition |
| Overtime Policy | Overtime policy to be applied for this shift schedule definition. |
| Statutory Holiday | Statutory holidays for the shift schedule definition. |
| Shift Schedule Weekday | Organizes shift hours with the number of working days per week |
Create A Shift Schedule Definition
To CREATE a Shift Schedule Definition that organizes shift hours with the number of working days per week, follow these steps:
Navigation 
By default, you will be in Search Mode.
1. Click on the New icon ![]() . You will then be in Insert Mode.
. You will then be in Insert Mode.
2. Enter the new Shift Schedule Definition information. Fields with an asterisk  are mandatory fields.
3. Enter the Code, and click on the Allow Overtime Partial Hours, Flexible Schedule, Fixed Salary, as required.
- Code: Unique identification number representing the Shift Schedule Definition
- Allow Overtime Partial Hours: Specifies whether this shift schedule definition accepts partial hours to be paid on overtime or not.
- Flexible Schedule: Specifies whether this shift schedule definitions accepts flexibility on schedule or not. When this box is checked that means that this shift schedule definition will be validating only the hours per day that must be fulfilled.
- Fixed Salary: This is to indicate if the employee gets paid a fixed salary independent of the fact that there is 21 days in a month or 22 days.
4. Fill the Minimum Hours Per Day, Minimum Hours Per Week, Minimum Hours Per Month, and Maximum Overtime Hours Per Pay Period fields as required.
- Minimum Hours Per Day: Specifies the minimum hours per day that must be fulfilled.
- Minimum Hours Per Week: Specifies the minimum hours per week that must be fulfilled.
- Minimum Hours Per Month: Specifies the minimum hours per month that must be fulfilled.
- Maximum Overtime Hours Per Pay Period: Specifies the maximum overtime hours allowed to be paid for the pay period.
5. Select the Shift Schedule Type from the drop down menu.
- Shift Schedule Type: Can be on a 'Weekly' or 'Per Pay Period' basis.
6. Fill in the Rate for Statutory Holidays, Number of Hours per Day, and the Number of Work Days per Week as required.
- Rate for Statutory Holidays: Rate to apply to statutory holidays per Schedule Definition.
- Number of Hours per Day: Used during pay calculation to do salary conversions such as converting an annual salary to hourly.
- Number of Work Days per Week: Used during pay calculation to do salary conversions such as converting a weekly salary to a daily salary.
7. To enter the Tardiness Policy, click on the Lookup icon  , click on Find icon
  to retrieve the Tardiness Policy list, then select the Tardiness Policy.
- Tardiness Policy: The tardiness policy to be applied for this shift schedule definition.
8. To enter the Statutory Holiday Cost Item, click on the Lookup icon  , click on Find icon
  to retrieve the Cost Item list, then select the Cost Item. Refer to Cost Items for more information.
9. To enter the Overtime Policy, if required, click on the Lookup icon  , click on Find icon
  to retrieve the Overtime Policy list, then select the Overtime Policy. Refer to Overtime Policy for more information.
- Overtime Policy: If no overtime is selected this schedule will not allow overtime payment calculations.
10. Select the Language desired from the drop down menu.
11. Enter the Shift Schedule Description in the Description field.
12. To enter the Statutory Holiday, click on the Lookup icon  under
under click on Find icon
  to retrieve the Statutory Holiday list, then select the Statutory Holiday. Refer to the Statutory Holiday for more info.
13. Click the Remove icon  to remove the selected Statutory Holiday
14. Click the individual Select Checkbox (es), under  to select and de-select the Statutory Holiday (s), as required, or click the Select All icon
  or Unselect All
  icon, to select or de-select all Statutory Holidays.
15. Click on the New icon  under
under  to enter the Shift Schedule Weekday (refer to Shift Schedule Weekday for more information).
16. Click on the Save and Return icon  to save the Shift Schedule Weekday information and return to the Shift Schedule screen, or click on the Discard icon
  to discard the Shift Schedule Weekday entry and return to the Shift Schedule.
17. Click the Remove icon  to remove the selected Shift Schedule Weekday
18. Click the individual Select Checkbox (es), under  to select and de-select the Shift Schedule Weekday (s) as required, or click the Select All icon
  or Unselect All
  icon, to select or de-select all Shift Schedule Weekday.
19. Click on the Save icon  at the bottom to save your new Statutory Holiday information. A window will appear to confirm the new Statutory Holiday . Click OK to confirm.

Shift Schedule Weekday
Navigation  click the New Icon
 under
under 
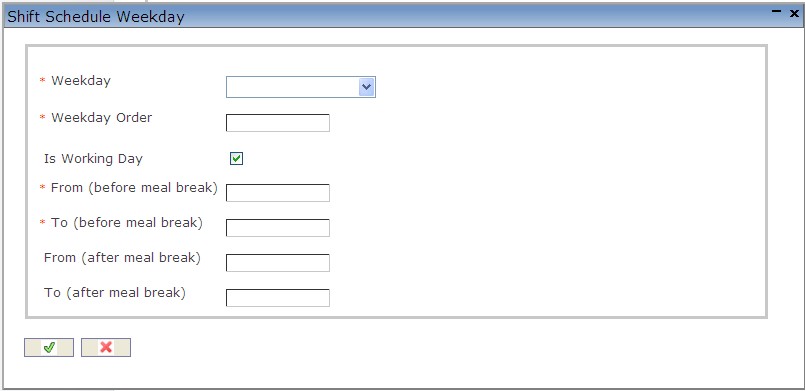
Create Shift Schedule Weekday
To CREATE a Shift Schedule Weekday that organizes shift hours with the number of working days per week, follow these steps:
1. Click on the New icon  under
under  to enter the Shift Schedule Weekday.
2. Select the Weekday from the drop down menu.
3. Enter the Weekday Order in the required field.
4. Check the Is Working Day box, if shift falls into that category.
5. Fill in the From (before meal break). To (before meal break), From (after meal break), and the To (after meal break) fields.
6. Click on the Save and Return icon  to save the Shift Schedule Weekday information and return to the Shift Schedule, or click on the Discard icon
  to discard the Shift Schedule Weekday entry and return to the Shift Schedule.
Delete A Shift Schedule Definition
To DELETE a Shift Schedule Definition that organizes shift hours with the number of working days per week, follow these steps:
Navigation 
By default, you will be in Search Mode.
- Find the Shift Schedule Definition you want to Delete
- Enter the information to be used as retrieval criteria in the appropriate field(s). If you prefer to see all Shift Schedule Definitions, leave all fields blank.
- Click Find
 .
. - Select the Shift Schedule Definitions you want to Delete.
- Click on the Delete icon
 .
. - A window will appear asking you to confirm

- Click OK to confirm and delete the Shift Schedule Definition.
- A window will be displayed confirming the Shift Schedule Definition has been deleted

To Verify that the Shift Schedule Definition has been Deleted:
- Click on the Search icon

- Enter the Shift Schedule Definition information in the appropriate field (s).
- Click on the Find icon

- This window will appear

Modify A Shift Schedule Definition
To DELETE a Shift Schedule Definition that organizes shift hours with the number of working days per week, follow these steps:
Navigation 
By default, you will be in Search Mode.
- Enter the information to be used as retrieval criteria in the appropriate field (s). If you prefer to see a list of all Shift Schedule Definitions, leave all fields blank.
- Click on the Find icon
 .
. - Click on the Shift Schedule Definition you want to modify.
You will then be in Update/Delete Mode. - Make the necessary modifications. To add or remove Shift Schedule Weekday (s), refer to Shift Schedule Weekday.
- Click on the Update icon
 at the bottom of the screen to save your modifications. A window will appear to confirm the modification. Click OK to confirm.
. 
Situation Code Levels Definition
Overview
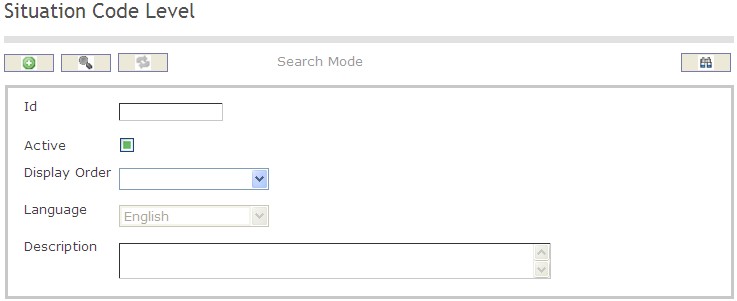
This screen includes the names of the situation code Levels. A situation code can have up to 4 levels.
Navigation 
Create A Situational Code Levels Definition
Navigation 
By default, you will be in Search Mode.
- Click on the New icon
 (you will then be in Insert Mode).
 - Enter the new Situational Code Levels Definition information. Fields with an asterisk
 are mandatory fields.
 - Enter the Code, click on the Active checkmark, as required, and select the Language, as required.
- Code: Unique identification code of the Situational Code Levels Definition.
- Active: Active Status - if checked, Situational Code Levels Definition is available.
- Enter A Description
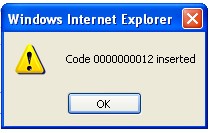
- Click Onto the Save icon at the bottom of the Situational Code Levels Definition to save your new Situational Code Levels Definition

- The following window will appear to confirm
Delete A Situation Code Levels Definition
By default, you will be in Search Mode.
- Find the Situation Code Levels Definition you want to Delete
- Enter the information to be used as retrieval criteria in the appropriate field(s). If you prefer to see all Situation Code Levels Definitions, leave all fields blank.
- Click Find

- Select the Situation Code Levels Definition you want to Delete
- Click on the Delete icon

- A window will appear asking you to confirm

- Click OK to confirm and delete the Situation Code Levels Definition.
- A window will be displayed confirming the Situation Code Levels Definitionhas been deleted

- Click on the Delete icon
To Verify that the Situation Code Levels Definition has been Deleted:
- Click on the Search icon

- Enter the Situation Code Levels Definition information
- Click on the Find icon

The window will appear 
Modify a Situation Code Levels Definition
Navigation 
By default, you will be in Search Mode.
- Enter the information to be used as retrieval criteria in the appropriate field(s).
If you prefer to see the list of all Situation Code Levels Definitions, leave all fields blank. - Click on the Find icon
 . The list of Situation Code Levels Definitions meeting the retrieval criteria will appear.
 - Click on the Situation Code Levels Definition you want to modify.
You will then be in Update/Delete Mode. - Make the necessary modification(s).
- Click on the Update icon
 at the bottom of the screen to save your modifications. A window will appear to confirm the modification. Click OK to confirm.
Situation Code Catalog
Overview
A situation code is an identifier that defines the employment status of an employee in the assignment. For example, a situation code will describe a position and the associated pay along with a start and end date of employment and other required information pertaining to that employee position. A Catalog of Situation Codes gathers together all the valid Situation Codes that can be used when linking an employee and a position. This function is available to search the catalog of situation codes as well as create, modify and delete codes. Situation Codes listed in this function can be combined with others that will be managed and organized in another function called Situation Code Combinations. Cost Items, which are further explained in various other functions, work closely with the situation code catalog as well. Situation Codes will be retrieved from the catalog here to produce situation code combinations and link them with cost items.
Navigation: 
How to SEARCH:
- Enter the information to be used as retrieval criteria in the appropriate field (s). If you prefer to see a list of all Situation Code Catalogs, leave all fields blank.
- Click on the Find icon
 .
.
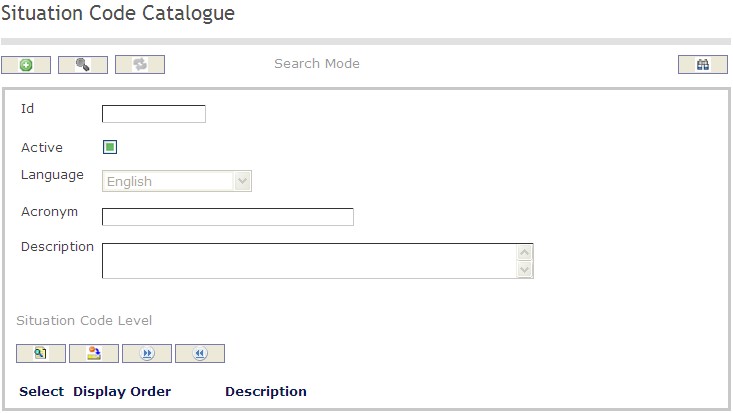
The Situation Code Catalog screen includes the following fields:
| Fields | Definitions |
| Active | Active Status - if checked, Situation Code is available |
| Acronym | Used for reporting and searching purposes. |
| Description | Situation Code description |
| Language | Language as chosen. |
Create a Situation Code
To CREATE a situation code in the Situation Code Catalog, follow the steps below:
Navigation 
By default, you will be in Search Mode.
- Click on the New icon
 . You will then be in Insert Mode.
 - Click on the Active, select Language from Drop Down List, enter the Acronym and Description
- Active: Active Status - if checked, Situation Code is available
- Acronym: used for reporting and searching purposes.
- Description: Situation Code description
- Language: Language as chosen.
3. Click on the Lookup icon  ,under
  , click on Find icon
  to retrieve the Situation Code Level list, then select the desired ID/Description and click Return
  or click on the Discard icon
  to discard the Situation Code entry and return to the Situation Codes Catalog screen.
4. Click the individual Select Checkbox(es), under  to select and de-select the Situation Code Level (s), as required, or click the Select All icon
  or Unselect All
  icon, to select or de-select all Situation Code Level (s), if required.
5. Click the Remove icon  to remove the selected Situation Code,if required.
6. Repeat steps 3 to 5 for all required Situation Codes.
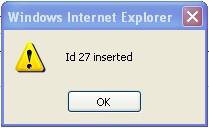
7. Click on the Save icon  at the bottom to save your new Situation Codes Catalog information. A window will appear to confirm the new Situation Code Catalog creation. Click OK to confirm
Delete a Situation Code
To DELETE a situation code from the Situation Codes Catalog, follow the steps below:
Navigation: 
By default, you will be in Search Mode.
- Find the Situation Code you want to Delete
- Enter the information to be used as retrieval criteria in the appropriate field(s). If you prefer to see all Situation Codes, leave all fields blank.
- Click Find
 .
. - Select the Situation Code you want to Delete.
- Click on the Delete icon
 .
. - A window will appear asking you to confirm

- Click OK to confirm and delete the Situation Code.
- A window will be displayed confirming the Situation Code has been deleted

To Verify that the Situation Code has been Deleted:
- Click on the Search icon

- Enter the Situation Code Catalog information in the appropriate field(s).
- Click on the Find icon

- This window will appear

Modify a Situation Code
To MODIFY a situation code in the Situation Code Catalog, follow the steps below:
Navigation: 
By default, you will be in Search Mode.
- Enter the information to be used as retrieval criteria in the appropriate field(s). If you prefer to see a list of all Situation Code Catalogs, leave all fields blank.
- Click on the Find icon
 .
. - Click on the Situation Code you want to modify.
You will then be in Update/Delete Mode. - Make the necessary modifications.
- Click on the Update icon
 at the bottom of the screen to save your modifications. A window will appear to confirm the modification. Click OK to confirm.
Situation Code Combination
Overview
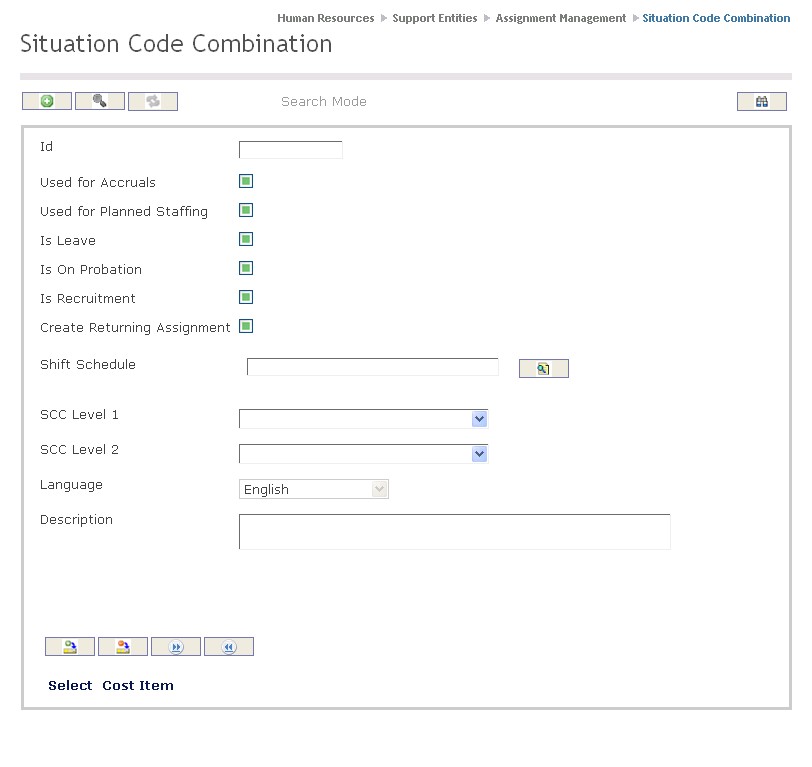
This screen includes the list of valid situation code combinations with the associated cost items, deductions and financial coding. Cost items can be linked to one or more situation codes that may be combined together. This function organizes and manages these combinations of situation codes that are to be associated with a specific cost item. There are variations of how each combination can affect a cost item, which is why this screen provides alternative options of how a situation code combination may function. These variances produce multiple calculation methods and differences between the cost items and deductions. There are two separate tabs in this function that individually organize cost items and deductions. One tab manages the relationship between a cost item and a situation code combination while the other tab manages the relationship between possible deductions and a situation code combination. Together all this data provides key information that will be utilized for payroll calculation and financial planning and forecasting. It is also a key component for tracking employee assignments and making any necessary decisions or modifications.
Navigation
How to SEARCH:
- Enter the information to be used as retrieval criteria in the appropriate field (s). If you prefer to see a list of all Situation Code Combinations, leave all fields blank.
- Click on the Find icon
 .
.
The Situation Code Combination screen includes the following fields:
| Fields | Definition |
| ID | Unique Situation Code Combination ID per Situation Code Combination generated by the system. |
| Used for Accruals | By default - Used for Accruals is not selected. It should be checked if accruals are generated by salary planning and forecasting. |
| Used for Planned Staffing | By default - Used for Planned Staffing is not selected. Should be checked if the Situation Code Combination is used for Planned Staffing. |
| Is Leave | By default - Is Leave is not selected. If checked, indicates Situation Code is Leave related. |
| Is On Probation | By default - Is On Probation is not selected. If checked, indicates combination is related to Probationary Period. |
| Is Recruitment | By default - Is Recruitment is not selected. If checked this situation code combination will be displayed in the recruitment management. |
| Shift Schedule | The work schedule related to the Situation Code Combination created and listed in the Shift Schedule Definition. |
| Situation Code Combination (SCC) | Is comprised of 0 or 1 Situation Code per level. A SCC can include as many Situation Codes as the number of Levels indicated. A Situation Code of Level1 is MANDATORY and all Levels must be distinct. All Situation Codes must be ordered consecutively in relation to their Levels. (Ex. 1-2-3-4 is valid. 1-2-4-3 is not valid) |
| Language | Language as chosen. |
| Description | Situation Code Combination Code Description. |
Create a Situation Code Combination
To CREATE a Situation Code Combination that lists all valid situation codes, follow the steps below:
Navigation 
By default, you will be in Search Mode.
- Click on the New icon
 (you will then be in Insert Mode).
 - Fields with an asterisk
 are mandatory fields.
 - Click on Used for Accruals, Used for Planned Staffing, Is Leave and Is On Probation as required.
- Used for Accruals: By default - Used for Accruals is not selected. It should be checked if the Situation Code Combination is used for accruals calculation.
- Used for Planned Staffing: By default - Used for Planned Staffing is not selected. Should be checked if the Situation Code Combination is used for Planned Staffing.
- Is Leave: By default - Is Leave is not selected. If checked, indicates Situation Code is Leave related.
- Is On Probation: By default - Is On Probation is not selected. If checked, indicates combination is related to Probationary Period.
4. To enter Shift Schedule, click on the Lookup icon  ,click on the Find icon
  to retrieve the Shift information, then select the Shift Schedule.
- Shift Schedule: The work schedule related to the Situation Code Combination created and listed in the Shift Schedule Definition.
5. Select the Situation Code Combination from the drop down menus as required.
- Situation Code Combination (SCC): is comprised of 0 or 1 Situation Code per level. A SCC can include as many Situation Codes as the number of Levels indicated. A Situation Code of Level 1 is MANDATORY and all Levels must be distinct. All Situation Codes must be ordered consecutively in relation to their Levels. (Ex. 1-2-3-4 is valid. 1-2-4-3 is not valid)
7. Select Language from Language Bar and enter Description.
- Language: Language as chosen.
- Description: Situation Code Combination Code Description.
To ADD a Cost Item to a Code Combination if required:
1. Click on the Cost Item tab, , Cost Item New icon
  and enter the new Cost Item (refer to Cost Item Per Situation Code Combination for more information).
2. Click the individual Select Checkbox(es), under  to select and de-select the Cost Items, as required, or click the Select All icon
  or Unselect All
  icon, to select or de-select all the Cost Items, if required.
3. Click the Remove icon  to remove the selected Cost Item, if required.
4. Repeat steps 1 to 3 as required for all Cost Items.
To ADD a new Deduction for a Situation Code Combination if required:
1. Click on the Deductions tab, , Deductions New icon
  ,and enter the new Deduction Per Situation Code (refer to Deductions Per Situation Code Combination for more information).
2. Click the individual Select Checkbox(es), under to select and de-select the Deduction(s), as required, or click the Select All icon
  or Unselect All
  icon, to select or de-select all Deductions, if required.
3. Click the Remove icon  to remove the selected Deduction(s), if required.
4. Repeat steps 1 to 3 as required for all Deductions Per Situation Code Combination.
Click on the Save icon  at the bottom to save your new Situation Code Combination information. A window will appear to confirm the new Situation Code Combination creation. Click OK to confirm.

Cost Item Per Situation Code Combination
Navigation (From click the New icon
 under
under )
)
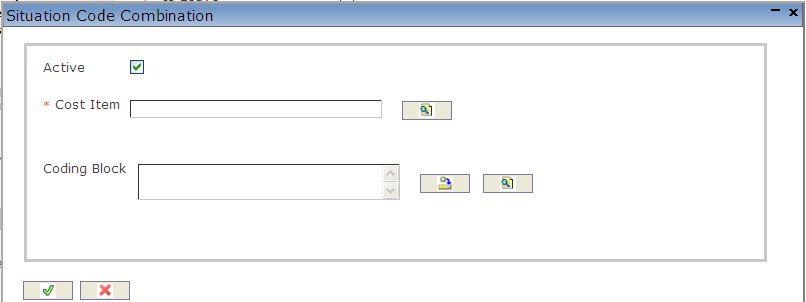
Create a Cost Item Per Situation Code Combination
1. Enter the new Situation Code Combination information. Field with an asterisk  are mandatory fields.
2. Check the Active checkmark if required. By Default - Active is selected.
- Active - when checked indicates the Situation Code Combination is available.
3. To enter the Cost Item, click on the Lookup icon  , click on Find icon
  to retrieve the Cost Item list, then select the appropriate Cost Item.
4. To enter the Coding Block, if required, click on the New icon or click on the Lookup icon
 to retrieve the appropriate Coding Block. Click on Find icon
  to retrieve the Coding Block list, then select the appropriate Coding Block.
- Coding Block: This field has the full or partial coding block information. This entry is optional. If entered, the full or partial coding block will overwrite the coding from Employee Assignment.
5. Click on the Save and Return icon  to save the Cost Item information and return to the Situation Code Combination, or click on the Discard icon
  to discard the Cost Item entry and return to the Situation Code Combination.
Deductions Per Situation Code Combination
Navigation (From click the New icon
 under
under )
)
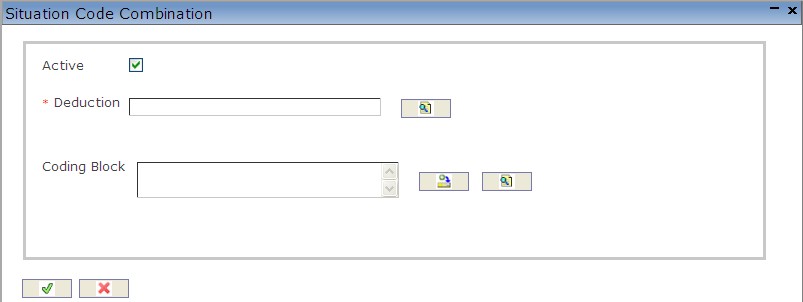
Create a Deduction Per Situation Code Combination
1. Enter the new Situation Code Combination information. Field with an asterisk  are mandatory fields.
2. Check the Active checkmark if required. By Default - Active is selected.
- Active - when checked indicates the Situation Code Combination is available.
3. To enter the Deduction, click on the Lookup icon  , click on Find icon
  to retrieve the Deduction list, then select the appropriate Deduction.
4. To enter the Coding Block, if required, click on the New icon or click on the Lookup icon
  to retrieve the appropriate Coding Block. Click on Find icon
  to retrieve the Coding Block list, then select the appropriate Coding Block.
- Coding Block: This field has the full or partial coding block information. This entry is optional. If entered, full or partial coding block will overwrite the coding from Employee Assignment.
5. Click on the Save and Return icon  to save the Deduction information and return to the Situation Code Combination, or click on the Discard icon
  to discard the Deduction entry and return to the Situation Code Combination.
Delete a Situation Code Combination
To DELETE a Situation Code Combination that lists all valid situation codes, follow the steps below:
Navigation
By default, you will be in Search Mode.
- Find the Situation Code Combination you want to Delete
- Enter the information to be used as retrieval criteria in the appropriate field(s). If you prefer to see all Situation Code Combinations, leave all fields blank.
- Click Find
 .
. - Select the Situation Code Combination you want to Delete.
- Click on the Delete icon
 .
. - A window will appear asking you to confirm

- Click OK to confirm and delete the Situation Code Combination.
- A window will be displayed confirming the Situation Code Combination has been deleted.

To Verify that the Situation Code Combination has been Deleted:
- Click on the Search icon

- Enter the Situation Code Combination information in the appropriate field(s).
- Click on the Find icon

- This window will appear

Modify a Situation Code Combination
To MODIFY a Situation Code Combination that lists all valid situation codes, follow the steps below:
Navigation
By default, you will be in Search Mode.
- Enter the information to be used as retrieval criteria in the appropriate field(s). If you prefer to see a list of all Situation Combination Codes, leave all fields blank.
- Click on the Find icon
 .
. - Click on the Situation Code Combination you want to modify.
You will then be in Update/Delete Mode. - Make the necessary modifications. To add or remove Cost Items, refer to Cost Items Per Situation Code Combination. To add or remove Deductions, refer to the Deductions Per Situation Code Combination.
- Click on the Update icon
 at the bottom of the screen to save your modifications. A window will appear to confirm the modification. Click OK to confirm.
Statutory Holiday
Overview
Here you will find a list of Statutory Holidays. Statutory holidays manage one of the cost items associated with an employee assignment. Statutory holidays produce another cost applied against the organization. Holidays can be created, deleted and modified in this screen. This function allows the ability to specify whether employees will be paid or not on a particular Statutory Holiday. The Statutory Holiday function manages one of the cost items associated with an employee. Statutory holidays and associated Cost Items are used by payroll calculation and financial planning and forecasting.
Navigation

How to SEARCH:
- Enter the information to be used as retrieval criteria in the appropriate field (s). If you prefer to see a list of all Statutory Holidays, leave all fields blank.
- Click on the Find icon
 .
.
The Statutory Holiday screen includes the following fields:
| Fields | Definitions |
| Date | Choose date from the Calendar. |
| Name | Full name |
| Is Payable | By Default - is checked, and indicates that the employee will be paid on that Statutory Holiday. |
Create a Statutory Holiday
To CREATE a Statutory Holiday, which applies another cost to an organization, follow the steps below:
Navigation
By default, you will be in Search Mode.
- Click on the New icon
 (you will then be in Insert Mode).
 - Enter the new Statutory Holiday information. Fields with an asterisk
 are mandatory fields.
 - Select the Date, Is Payable if required, Language from the Language Bar and enter Name.
- Date: Choose date from the Calendar.
- Name: Full name
- Is Payable: By Default - is checked and indicates that the employee will be paid on that Statutory Holiday.
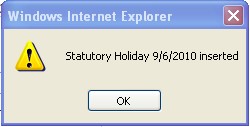
- Click on the Save icon
 at the bottom to save your new Statutory Holiday information. A window will
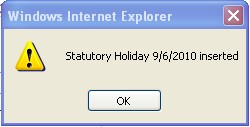
appear to confirm the new Holiday creation. Click OK to continue.
 .
.
.
Delete a Statutory Holiday
To DELETE a Statutory Holiday, which applies another cost to an organization, follow the steps below:
Navigation: 
By default, you will be in Search Mode.
- Find the Statutory Holiday you want to Delete
- Enter the information to be used as retrieval criteria in the appropriate field(s). If you prefer to see all Statutory Holidays, leave all fields blank.
- Click Find
 .
. - Select the Statutory Holiday you want to Delete.
- Click on the Delete icon
 .
. - A window will appear asking you to confirm

- Click OK to confirm and delete the Statutory Holiday.
- A window will be displayed confirming the Statutory Holiday has been deleted

To Verify that the Statutory Holiday has been Deleted:
- Click on the Search icon

- Enter the Statutory Holiday information in the appropriate field(s).
- Click on the Find icon

- This window will appear

Modify a Statutory Holiday
To MODIFY a Statutory Holiday, which applies another cost to an organization, follow the steps below:
Navigation
By default, you will be in Search Mode.
- If you know the Date and/or Name, enter the information in the appropriate fields. If you want to see a list of all Holidays, click on Search icon
 and leave fields blank.
 - Click on the Find icon
 .
. - Click on the Holiday you want to modify.
You will then be in Update/Delete Mode. - Make the necessary modifications. Click on the Update icon
 at the bottom to save your modifications.
 - A Window will appear confirming your updates. Click OK to confirm
