Retirement Management
Retirement Type
Overview
This screen is a catalogue of the different Retirement Types available for a particular implementation. Information includes the type of retirement (voluntary, mandatory, retirement by death), the mandatory retirement age, the minimum months in service required to apply to a retirement type, the minimum periods in consecutive service to apply to a retirement type, and the name of the retirement type.
Navigation 
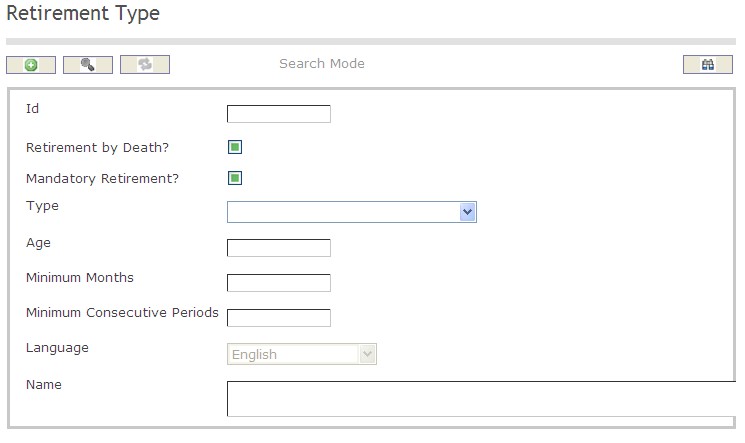
How to SEARCH:
- Enter the information to be used as retrieval criteria in the appropriate field (s). If you prefer to see a list of all Retirement Types, leave all fields blank.
- Click on the Find icon
 .
.
The Retirement Type screen includes the following fields:
| Report Fields | Description |
| ID | Unique identification code of the Retirement Type |
| Retirement by Death | Retirement by Death Status - if checked, indicates that the Retirement Type is only applicable when the employee is deceased |
| Mandatory Retirement | Mandatory Retirement Status - if checked, indicates that the Retirement is mandatory |
| Type | Either Mandatory Retirement, Retirement by Death, or Voluntary, from the drop-down menu |
| Age | Mandatory Retirement Age of the employee |
| Minimum Months | The minimum months in service required to apply to this retirement type |
| Minimum Consecutive Periods | The minimum periods required in consecutive service to apply to this retirement type |
| Language | Language used |
| Name | Name of the retirement type |
Create a Retirement Type
Retirement Type is a catalogue of the different Retirement Types available for a particular implementation. To CREATE a Retirement Type, follow the steps below:
Navigation 
By default, you will be in Search Mode.
- Click on the New icon
 (you will then be in Insert Mode).
 - Enter the new Retirement Type information. Fields with an asterisk
 are mandatory fields.
 - Enter the ID, click on the Retirement by Death and Mandatory Retirement checkmarks, as required.
- ID: Unique identification code of the Retirement Type.
- Retirement by Death: Retirement by Death Status - if checked, indicates that the Retirement Type is only applicable when the employee is deceased.
- Mandatory Retirement: Mandatory Retirement Status - if checked, indicates that the Retirement is Mandatory .
4. Select a Type.
- Type: Either Mandatory Retirement, Retirement by Death, or Voluntary, from the drop-down menu.
5. Enter Age.
- Age: Mandatory Retirement Age.
6. Enter the Minimum Months.
- Minimum Months: The minimum months in service required to apply to this retirement type.
7. Enter the Minimum Consecutive Periods.
- Minimum Consecutive Periods: The minimum periods required in consecutive service to apply to this retirement type.
8. Select the Language, as required.
- Language: Language used.
9. Enter Name.
- Name: Name of the retirement type.
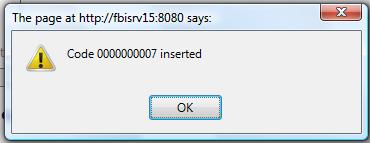
10. Click on the Save icon  at the bottom of the Retirement Type page to save your new Retirement Type information. A window will appear to confirm.
Delete a Retirement Type
Retirement Type is a catalogue of the different Retirement Types available for a particular implementation. To DELETE a Retirement Type, follow the steps below:
Navigation 
By default, you will be in Search Mode.
- Find the Retirement Type you want to Delete
- Enter the information to be used as retrieval criteria in the appropriate field(s). If you prefer to see all Retirement Types, leave all fields blank.
- Click Find

- Select the Retirement Type you want to Delete
- Click on the Delete icon

- A window will appear asking you to confirm
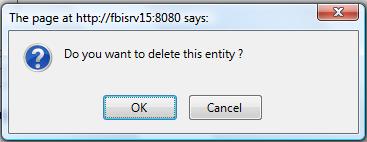
- Click OK to confirm and delete the Retirement Type.
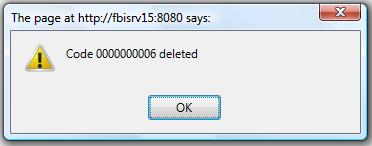
- A window will be displayed confirming the Retirement Type has been deleted
To Verify that the Retirement Type has been Deleted:
- Click on the Search icon

- Enter the Retirement Type information
- Click on the Find icon

- The window will appear

Modify a Retirement Type
Retirement Type is a catalogue of the different Retirement Types available for a particular implementation. To MODIFY a Retirement Type, follow the steps below:
Navigation 
By default, you will be in Search Mode.
- Enter the information to be used as retrieval criteria in the appropriate field(s).
If you prefer to see the list of all Retirement Types, leave all fields blank. - Click on the Find icon
 . The list of Retirement Types meeting the retrieval criteria will appear.
 - Click on the Retirement Types you want to modify.
You will then be in Update/Delete Mode. - Make the necessary modification(s).
- Click on the Update icon
 at the bottom of the screen to save your modifications. A window will appear to confirm the modification. Click OK to confirm.
Retirement Benefit Type
Overview
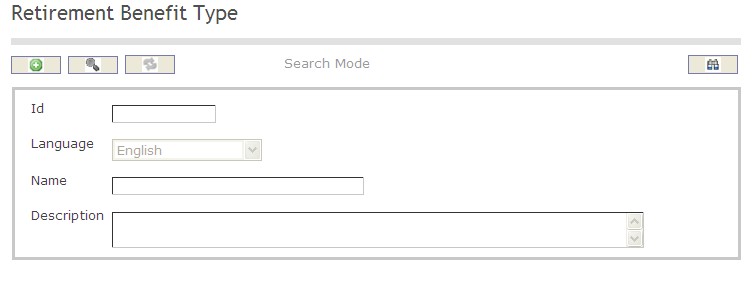
Requires the user to define the different Retirement Benefit Types. Information to be entered includes the name of the retirement benefit type, as well as a detailed description of the retirement benefit type.
Navigation 
How to SEARCH:
- Enter the information to be used as retrieval criteria in the appropriate field (s). If you prefer to see a list of all Retirement Benefit Types, leave all fields blank.
- Click on the Find icon
 .
.
The Retirement Benefit Type screen includes the following fields:
| Report Fields | Description |
| ID | Unique identification code of the Retirement Benefit Type |
| Language | Language used |
| Name | Name of the Retirement Benefit Type |
| Description | List a short description of the Retirement Benefit Type |
Create a Retirement Benefit Type
Retirement Benefit Type requires the user to define the different Retirement Benefit Types. To CREATE a Retirement Benefit Type, follow the steps below:
Navigation 
By default, you will be in Search Mode.
- Click on the New icon
 (you will then be in Insert Mode).
 - Enter the new Retirement Benefit Type information. Fields with an asterisk
 are mandatory fields.
 - Enter the ID and select the Language, as required.
- ID: Unique identification code of the Retirement Benefit Type.
- Language: Language used.
- Enter Name.
- Name: Name of the Retirement Benefit Type.
5. Enter Description.
- Description: List a short description of the Retirement Benefit Type.
6. Click on the Save icon  at the bottom of the Retirement Benefit Type page to save your new Retirement Benefit Type information. A window will appear to confirm.

Delete a Retirement Benefit Type
Retirement Benefit Type requires the user to define the different Retirement Benefit Types. To DELETE a Retirement Benefit Type, follow the steps below:
Navigation 
By default, you will be in Search Mode.
- Find the Retirement Benefit Type you want to Delete
- Enter the information to be used as retrieval criteria in the appropriate field(s). If you prefer to see all Retirement Benefit Types, leave all fields blank.
- Click Find

- Select the Retirement Benefit Type you want to Delete
- Click on the Delete icon

- A window will appear asking you to confirm

- Click OK to confirm and delete the Retirement Benefit Type.
- A window will be displayed confirming the Retirement Benefit Type has been deleted

To Verify that the Retirement Benefit Type has been Deleted:
- Click on the Search icon

- Enter the Retirement Benefit Type information
- Click on the Find icon

- The window will appear

Modify a Retirement Benefit Type
Retirement Benefit Type requires the user to define the different Retirement Benefit Types. To MODIFY a Retirement Benefit Type, follow the steps below:
Navigation 
By default, you will be in Search Mode.
- Enter the information to be used as retrieval criteria in the appropriate field(s).
If you prefer to see the list of all Retirement Benefit Types, leave all fields blank. - Click on the Find icon
 . The list of Retirement Benefit Types meeting the retrieval criteria will appear.
 - Click on the Retirement Benefit Type you want to modify.
You will then be in Update/Delete Mode. - Make the necessary modification(s).
- Click on the Update icon
 at the bottom of the screen to save your modifications. A window will appear to confirm the modification. Click OK to confirm.
Retirement Benefit Plan
Overview
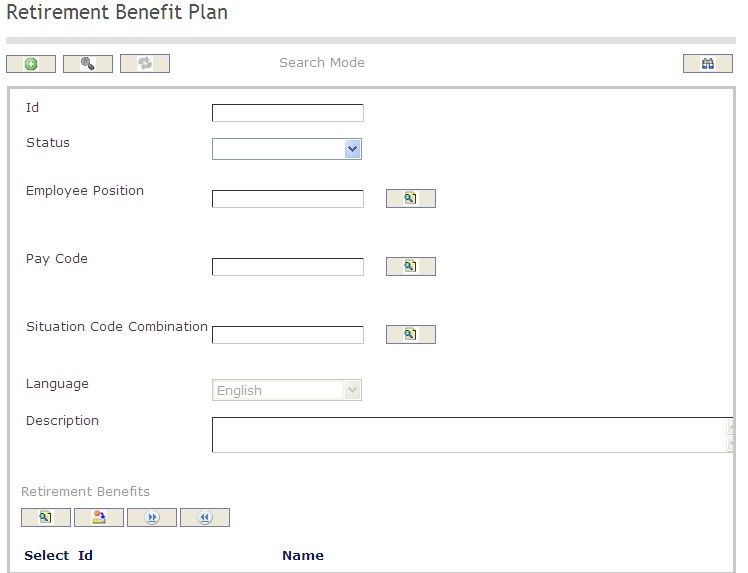
This screen represents a collection of retirement benefits included as part of the Retirement Benefits Plan for one or more employees. This screen requires the user to define a catalog of different retirement plans available. This will require a tab at the bottom to associate the different possible Retirement Benefits available for this plan. Different plans may have the same benefits.
Navigation 
How to SEARCH:
- Enter the information to be used as retrieval criteria in the appropriate field (s). If you prefer to see a list of all Retirement Benefit Plans, leave all fields blank.
- Click on the Find icon
 .
.
The Retirement Benefit Plan screen includes the following fields:
| Report Fields | Description |
| ID | Unique identification code of the Retirement Benefit Plan |
| Status | This attribute can take one of the following values: Approved, Cancelled, Created, Rejected, and Requested for Approval |
| Employee Position | Employee Position to be included in the assignment that will be created |
| Pay Code | Pay code to be included in the assignment that will be created |
| Situation Code Combination | The situation code to be included in the assignment that will be created |
| Language | Language used |
| Description | Enter a detailed description of the Retirement Benefit Plan |
Create a Retirement Benefit Plan
Retirement Benefit Plan represents a collection of retirement benefits for one or more employees. To CREATE a Retirement Benefit Plan, follow the steps below:
Navigation 
By default, you will be in Search Mode.
- Click on the New icon
 (you will then be in Insert Mode).
 - Enter the new Retirement Benefit Plan information. Fields with an asterisk
 are mandatory fields.
 - Enter the ID, as required.
- ID: Unique identification code of the Retirement Benefit Plan.
4. Enter the Status.
- Status: This attribute can take one of the following values: Approved, Cancelled, Created, Rejected, and Requested for Approval.
5. To enter the Employee Position data, if required, click on the Lookup icon  , click on the Find icon
  to retrieve the Employee Position list, then select the Employee Position.
- Employee Position: This is the employee position to be included in the assignment that will be created.
6. To enter the Pay Code information, if required, click on the Lookup icon  , click on the Find icon
  to retrieve the Pay Code list, then select the Pay Code.
Pay Code: The pay code to be included in the assignment to be created .
7. To enter the Situation Code Combination, if required, click on the Lookup icon  , click on Find icon
  to retrieve the Situation Code Combination list, then select the Situation Code Combination.
- Situation Code Combination: The situation code to be included in the assignment that will be created.
8. Enter the Language.
- Language: Language used.
9. Enter the Description.
- Description: Enter a detailed description of the Retirement Benefit Plan.
To ADD Retirement Benefits to the Retirement Benefit Plan list:
- Click on the Lookup icon
 , and enter the Retirement Benefits information, or leave the Retirement Benefits information blank to retrieve all Retirement Benefits.
 - Click the Remove icon
 to remove the selected Retirement Benefits, if required.
 - Click the individual Select Checkbox (es) to select and de-select the Retirement Benefit (s), as required, or click the Select All icon
 or Unselect All
  icon, to select all Retirement Benefits or de-select all Retirement Benefits, if required.
Click on the Save icon  at the bottom of the Retirement Benefit Plan page to save your new Retirement Benefit Plan information. A window will appear to confirm.

Delete a Retirement Benefit Plan
Retirement Benefit Plan represents a collection of retirement benefits included as part of the Retirement Benefits Plan for one or more employees. To DELETE a Retirement Benefit Plan, follow the steps below:
Navigation 
By default, you will be in Search Mode.
- Find the Retirement Benefit Plan you want to Delete
- Enter the information to be used as retrieval criteria in the appropriate field(s). If you prefer to see all Retirement Benefit Plans, leave all fields blank.
- Click Find

- Select the Retirement Benefit Plan you want to Delete
- Click on the Delete icon

- A window will appear asking you to confirm

- Click OK to confirm and delete the Retirement Benefit Plan.
- A window will be displayed confirming the Retirement Benefit Plan has been deleted

To Verify that the Retirement Benefit Plan has been Deleted:
- Click on the Search icon

- Enter the Retirement Benefit Plan information
- Click on the Find icon

- The window will appear

Modify a Retirement Benefit Plan
Retirement Benefit Plan represents a collection of retirement benefits included as part of the Retirement Benefits Plan for one or more employees. To MODIFY a Retirement Benefit Plan, follow the steps below:
Navigation 
By default, you will be in Search Mode.
- Enter the information to be used as retrieval criteria in the appropriate field(s).
If you prefer to see the list of all Retirement Benefit Plans, leave all fields blank. - Click on the Find icon
 . The list of Retirement Benefit Plans meeting the retrieval criteria will appear.
 - Click on the Retirement Benefit Plan you want to modify.
You will then be in Update/Delete Mode. - Make the necessary modification(s).
- Click on the Update icon
 at the bottom of the screen to save your modifications. A window will appear to confirm the modification. Click OK to confirm.
Retirement Benefit
Overview
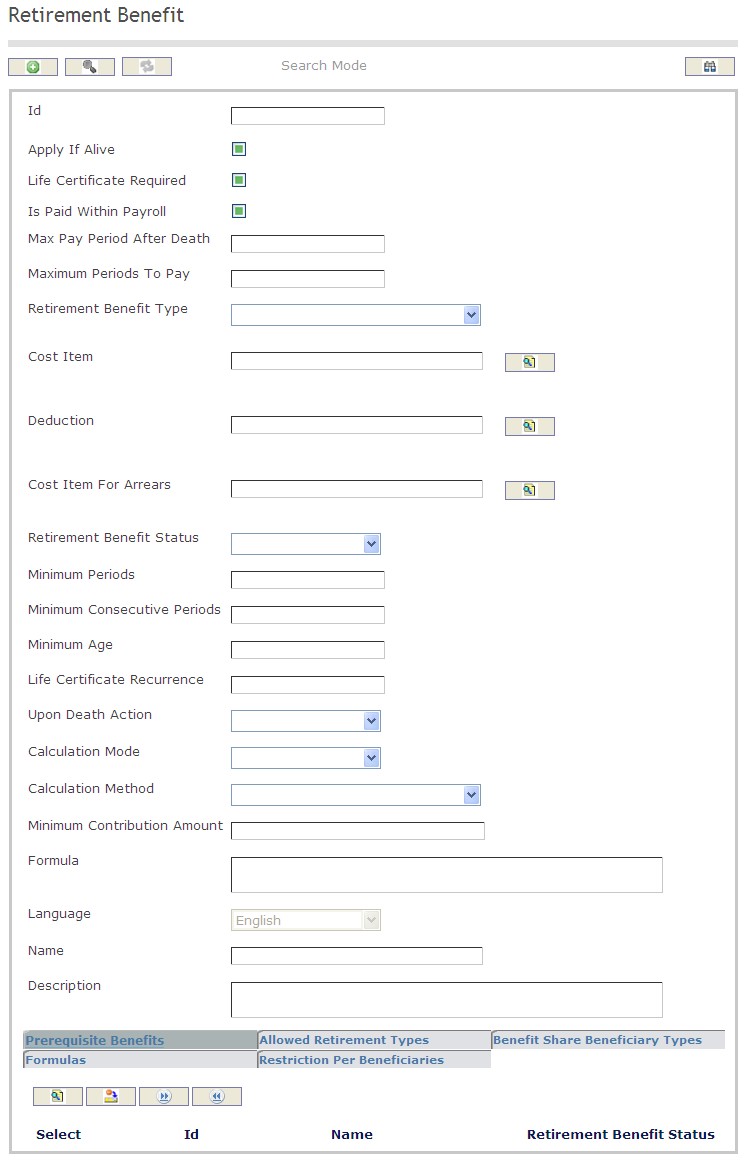
Requires a user to define benefits paid to an employee upon the employee's retirement. This screen will have tabs at the bottom of the form to define Prerequisite Benefits, Retirement Type, Restriction per Beneficiary Collection and the Formula Builder.
Navigation 
How to SEARCH:
- Enter the information to be used as retrieval criteria in the appropriate field (s). If you prefer to see a list of all Retirement Benefits, leave all fields blank.
- Click on the Find icon
 .
.
The Retirement Benefit screen includes the following fields:
| Report Fields | Description |
| ID | Unique identification code of the Retirement Benefit |
| Apply If Alive | Apply If Alive Status - if checked, Retirement Benefits are applied during employee's retirement, when the employee is alive. |
| Life Certificate Required | Life Certificate Required Status - if checked, it specifies if this Retirement Benefit must require a life certificate in order to keep receiving the emoluments granted by this benefit |
| Is Paid Within Payroll | Is Paid Within Payroll Status - if checked, employee is on the payroll of the organization |
| Max Pay Period After Death | The maximum number of pay periods that the beneficiaries are entitled to receive from this particular retirement benefit after the death of the employee |
| Maximum Periods To Pay | Maximum number of periods to pay Retirement Benefits to a retired employee. If set to null, the benefit will be recurrently paid until the death of the employee |
| Retirement Benefit Type | Retirement Benefit Type to be selected from the drop-down menu |
| Cost Item | The cost item associated to this benefit if the retirement benefit is for an Employee |
| Deduction | The deduction associated to this benefit if the retirement benefit depends on a deduction |
| Cost Item For Arrears | The cost item associated to this benefit specifically to be used for arrears. The default value is as specified under Cost Item above |
| Retirement Benefit Status | Retirement Benefit Status (Approved, Cancelled, or Created ) from the drop-down menu |
| Minimum Periods | The minimum number of periods required to apply the retirement benefit |
| Minimum Consecutive Periods | The minimum number of consecutive periods required to be eligible for this retirement benefit |
| Minimum Age | Minimum age of the employee to apply the retirement benefit |
| Life Certificate Recurrence | Specifies the frequency in terms of number of periods, for issuance of the Life Certificate (e.g. every 12 periods) |
| Upon Death Action | Action to take upon the death of pensioner: Activate Benefit or Cancel Benefit, from the drop-down menu |
| Calculation Mode | Benefit Calculation Mode: Automatic or Manual, from the drop-down menu |
| Calculation Method | Benefit Calculation Method: Base Salary or Deduction Contribution Amount, from the drop-down menu |
| Minimum Contribution Amount | Minimum amount to be made through a deduction. This field is only applicable if the benefit is linked to a deduction |
| Formula | Formula built from all rows in the formula builder, to be interpreted during payroll calculation. |
| Language | Language used |
| Name | Name of the Retirement Benefit |
| Description | Description of the Retirement Benefit |
Create a Retirement Benefit
Retirement Benefits requires the user to define benefits paid to an employee upon the employee's retirement. To CREATE a Retirement Benefit, follow the steps below:
Navigation 
By default, you will be in Search Mode.
- Click on the New icon
 (you will then be in Insert Mode).
 - Enter the new Retirement Benefit information. Fields with an asterisk
 are mandatory fields.
 - Enter the ID, click on the Apply If Alive, Life Certificate Required, and Is Paid Within Payroll checkmarks, as required.
- ID: Unique identification code of the Retirement Benefit.
- Apply If Alive: Apply If Alive Status - if checked, Retirement Benefits are applied to the employee's beneficiaries when the retired employee is alive.
- Life Certificate Required: Life Certificate Required Status - if checked, indicates that a life certificate is required in order to keep receiving the emoluments granted by this benefit.
Is Paid Within Payroll: Is Paid Within Payroll Status - if checked, Retirement Benefits are paid within the payroll of the organization.
4. Enter Max Pay Period After Death.
- Max Pay Period After Death: The maximum number of pay periods that the beneficiaries are entitled to receive the Retirement Benefits after the death of the employee.
5. Enter Maximum Periods To Pay.
- Maximum Periods To Pay: The maximum number of periods to pay Retirement Benefits to a retired employee. If Null, the Retirement Benefits will be recurrently paid until the death of the employee.
6. Choose a Retirement Benefit Type.
- Retirement Benefit Type: Choose a Retirement Benefit Type from the drop-down menu.
7. To enter the Cost Item, if required, click on the Lookup icon  , click on the Find icon
  to retrieve the Cost Item list, then select the Cost Item.
- Cost Item: The cost item associated to this benefit.
8. To enter the Deduction, if required, click on the Lookup icon  , click on Find icon
  to retrieve the Deduction list, then select the Deduction.
- Deduction: The deduction associated to this benefit.
9. To enter the Cost Item For Arrears, if required, click on the Lookup icon  , click on Find icon
  to retrieve the Cost Item list, then select the Cost Item For Arrears.
- Cost Item For Arrears: The cost item associated to this benefit specifically to be used for arrears.
10. Choose Retirement Benefit Status.
- Retirement Benefit Status: Choose either Approved, Cancelled, or Created from the drop-down menu.
11. Enter Minimum Periods.
- Minimum Periods: The minimum number of periods required to apply to this Retirement Benefit.
12. Enter Minimum Consecutive Periods.
- Minimum Consecutive Periods: The minimum number of consecutive periods required to be eligible for this retirement benefit.
13. Enter Minimum Age.
- Minimum Age: Minimum age of the employee to apply to this benefit.
14. Enter Life Certificate Recurrence.
- Life Certificate Recurrence: Specifies the frequency in terms of number of periods, for issuance of the Life Certificate (e.g. every 12 periods)
15. Choose Upon Death Action.
- Upon Death Action: Action to be taken upon death of the employee, either Activate Benefit or Cancel Benefit, from the drop-down menu
16. Choose Calculation Mode.
- Calculation Mode: Benefit Calculation Mode, either Automatic or Manual, from the drop-down menu
17. Choose Calculation Method.
- Calculation Method: Calculation Method, either Base Salary or Deduction Contribution Amount, from the drop-down menu.
18. Enter Minimum Contribution Amount.
- Minimum Contribution Amount: Applicable when the benefit is linked to a deduction, this is the minimum contribution amount to be made through a deduction.
19. Enter Formula.
- Formula: This will display the formula built from all rows in the formula builder.
20. Chose a Language.
- Language: Language used.
21. Enter the Name.
- Name: Name of the Retirement Benefit.
22. Enter the Description.
- Description: Description of the Retirement Benefit.
To ADD Prerequisite Benefits to the Retirement Benefits, if required:
1. Click on the  tab and then click on the Lookup icon
  , and enter the Prerequisite Benefit information, or leave the Prerequisite Benefit information blank to retrieve all Prerequisite Benefits.
2. Click the Find icon 
3. Click the individual Select Checkbox (es) to select and de-select the Prerequisite Benefits, as required.
4. Repeat steps 1, 2 and 3 for all required Prerequisite Benefits.
5. Click the Remove icon  to remove the selected Prerequisite Benefits information, if required.
6. Click the individual Select Checkbox (es) to select and de-select the Prerequisite Benefits, as required, or click the Select All icon  or Unselect All
  icon, to select all Prerequisite Benefits or de-select all Prerequisite Benefits, if required.
To ADD Allowed Retirement Types to the Retirement Benefits:
1. Click on the  tab and then click on the Lookup icon
  , and enter the Allowed Retirement Type information, or leave the Allowed Retirement Type information blank to retrieve all Allowed Retirement Types.
2. Repeat steps 2-6 which were used above for the  tab.
tab.
To ADD Benefit Share Beneficiary Types to the Retirement Benefits, if required:
1. Click on the  tab and then click on the Lookup icon
  , and enter the Benefit Share Beneficiary Type information, or leave the Benefit Share Beneficiary Type information blank to retrieve all Benefit Share Beneficiary Types.
2. Repeat steps 2-6 which were used above for the  tab.
tab.
To ADD Formulas to the Retirement Benefits, if required:
1. Click on the  tab and then click on the New icon
  to enter Formulas (refer to Formulas for more information).
2. Click on the Save and Return icon  to save the Formula information and return to the Retirement Benefits screen, or click on the Discard icon
  to discard the Formula entry and return to the Retirement Benefits screen.
3. Click the Remove icon  to remove the selected Formula information, if required.
4. Click the individual Select Checkbox (es) to select and de-select the Formulas, as required, or click the Select All icon  or Unselect All
  icon, to select all Formulas or de-select all Formulas, if required.
To ADD Restriction Per Beneficiaries to the Retirement Benefits, if required:
1. Click on the  tab and then click on the New icon
  to enter Restriction Per Beneficiaries (refer to Restriction Per Beneficiaries for more information).
2. Click on the Save and Return icon  to save the Restriction Per Beneficiary information and return to the Retirement Benefits screen, or click on the Discard icon
  to discard the Restriction Per Beneficiary entry and return to the Retirement Benefits screen.
3. Click the Remove icon  to remove the selected Restriction Per Beneficiary information, if required.
4. Click the individual Select Checkbox (es) to select and de-select the Restriction Per Beneficiaries, as required, or click the Select All icon  or Unselect All
  icon, to select all Restriction Per Beneficiaries or de-select all Restriction Per Beneficiaries, if required.
Click on the Save icon  at the bottom of the Retirement Benefit page to save your new Retirement Benefit information. A window will appear to confirm.

Formulas
Navigation (from  click the New Icon
 under
under  )
)
Create a Formula
Navigation (from  click the New Icon
 under
under  )
)
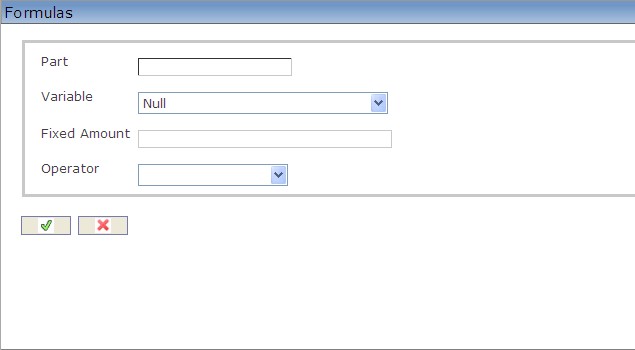
1. Enter the new Formula information.
2. Enter the Part.
- Part: The order in which the element of the formula will appear
3. Select a Variable from the drop-down menu.
- Variable: Choices include Initial Amount, Fixed Amount, Periods In Service, Consecutive Periods In Service, and Null
4. Enter the Fixed Amount.
- Fixed Amount: A fixed amount to be entered only if variable as defined in Step 3 is set to Fixed Amount
5. Select an Operator from the drop-down menu.
- Operator: Choices include: + ADD, - SUBTRACT, * MULTIPLY, / DIVIDE, ( START OF A GROUPING, ) END OF A GROUPING
6. Click on the Save and Return icon  to save the Formula information and return to the Retirement Benefits screen, or click on the Discard icon
  to discard the Formula entry and return to the Retirement Benefits screen.
Restriction Per Beneficiaries
Navigation (from  click the New Icon
 under
under  )
)
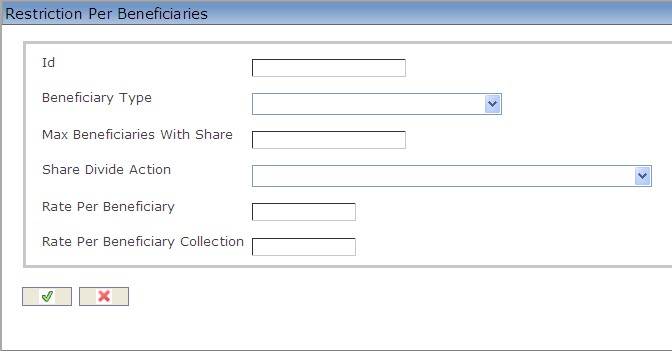
Create a Restriction Per Beneficiaries
Navigation (from  click the New Icon
 under
under  )
)
1. Enter the new Restriction Per Beneficiaries information.
2. Enter the ID, as required.
- ID: Unique identification code of the Restriction Per Beneficiaries
3. Select the Beneficiary Type from the drop-down menu.
- Beneficiary Type: The type of beneficiary receiving benefits (ie. Current Wife, Guardian, Father, Mother, Child, etc.)
4. Enter the Max Beneficiaries With Share.
- Max Beneficiaries With Share: Maximum number of beneficiaries. If no value specified means that this is an unlimited collection of beneficiaries
5. Select the Share Divide Action from the drop-down menu.
- Share Divide Action: The action taken to divide the share benefits amongst the specified beneficiaries. If Divide Into Beneficiaries is selected, the benefits are divided evenly amongst the specified beneficiaries. If Divide Into Beneficiaries If Maximum Is Reached is selected, the benefits are divided evenly amongst the specified beneficiaries up to the maximum number approved for benefits. If No Pay For Maximum Beneficiaries is selected, the benefits are divided evenly amongst the specified beneficiaries and not to the beneficiaries over the maximum value.
6. Enter Rate Per Beneficiary.
- Rate Per Beneficiary: The share, in percentage, that each of the beneficiaries is entitled to receive, example 16.66%
7. Enter Rate Per Beneficiary Collection.
- Rate Per Beneficiary Collection: Global rate, in percentage, for all beneficiaries collection that has to be divided into the number of beneficiaries, e.g. 50% of the pension payment and a collection of 3 beneficiaries, means that each beneficiary will receive a 50/3 share
8. Click on the Save and Return icon  to save the Restriction Per Beneficiary information and return to the Retirement Benefits screen, or click on the Discard icon
  to discard the Restriction Per Beneficiary entry and return to the Retirement Benefits screen.
Delete a Retirement Benefit
Retirement Benefits require a user to define benefits paid to an employee upon the employee's retirement. To DELETE a Retirement Benefit, follow the steps below:
Navigation 
By default, you will be in Search Mode.
- Find the Retirement Benefit you want to Delete
- Enter the information to be used as retrieval criteria in the appropriate field(s). If you prefer to see all Retirement Benefits, leave all fields blank.
- Click Find

- Select the Retirement Benefit you want to Delete
- Click on the Delete icon

- A window will appear asking you to confirm

- Click OK to confirm and delete the Retirement Benefit.
- A window will be displayed confirming the Retirement Benefit has been deleted

To Verify that the Retirement Benefit has been Deleted:
- Click on the Search icon

- Enter the Retirement Benefit information
- Click on the Find icon

- The window will appear

Modify a Retirement Benefit
Retirement Benefits require a user to define benefits paid to an employee upon the employee's retirement. To MODIFY a Retirement Benefit, follow the steps below:
Navigation 
By default, you will be in Search Mode.
- Enter the information to be used as retrieval criteria in the appropriate field(s).
If you prefer to see the list of all Retirement Benefits, leave all fields blank. - Click on the Find icon
 . The list of Retirement Benefits meeting the retrieval criteria will appear.
 - Click on the Retirement Benefit you want to modify.
You will then be in Update/Delete Mode. - Make the necessary modifications. To add or remove Formulas, refer to Formulas. Too add or remove Restrictions Per Beneficiaries, refer to Restriction Per Beneficiaries.
- Click on the Update icon
 at the bottom of the screen to save your modifications. A window will appear to confirm the modification. Click OK to confirm.
Beneficiary Type
Overview
This screen requires allows the user to be able to define possible Beneficiary types with a tab at the bottom to define the different Benefit Shares per Beneficiary type. Some examples of beneficiary types include current wife, father, mother, child, guardian, ex-wife, etc.
Navigation 
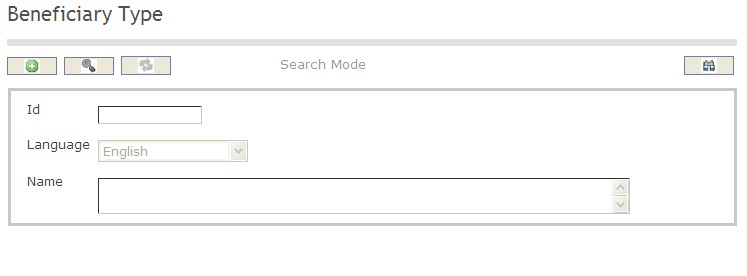
How to SEARCH:
- Enter the information to be used as retrieval criteria in the appropriate field (s). If you prefer to see a list of all Beneficiary Types, leave all fields blank.
- Click on the Find icon
 .
.
The Beneficiary Type screen includes the following fields:
| Report Fields | Description |
| ID | Unique identification code of the Beneficiary Type |
| Language | Language used |
| Name | Name of the beneficiary |
Create a Beneficiary Type
This screen requires allows the user to be able to define possible Beneficiary types with a tab at the bottom to define the different Benefit Shares per Beneficiary type. Some examples of beneficiary types include current wife, father, mother, child, guardian, ex-wife, etc. To ADD a Beneficiary Type, follow the steps below:
Navigation 
By default, you will be in Search Mode.
- Click on the New icon
 (you will then be in Insert Mode).
 - Enter the new Beneficiary Type information. Fields with an asterisk
 are mandatory fields.
 - Enter the ID and select the Language, as required.
- ID: Unique identification code of the Beneficiary Type.
- Language: Language used.
- Enter Name.
- Name: Name of the beneficiary.
5. Click on the Save icon  at the bottom of the Beneficiary Type to save your new Beneficiary Type information. A window will appear to confirm.

Delete a Beneficiary Type
This screen requires allows the user to be able to define possible Beneficiary types with a tab at the bottom to define the different Benefit Shares per Beneficiary type. Some examples of beneficiary types include current wife, father, mother, child, guardian, ex-wife, etc. To DELETE a Beneficiary Type, follow the steps below:
Navigation 
By default, you will be in Search Mode.
- Find the Beneficiary Type you want to Delete
- Enter the information to be used as retrieval criteria in the appropriate field(s). If you prefer to see all Beneficiary Type, leave all fields blank.
- Click Find

- Select the Beneficiary Type you want to Delete
- Click on the Delete icon

- A window will appear asking you to confirm

- Click OK to confirm and delete the Beneficiary Type.
- A window will be displayed confirming the Beneficiary Type has been deleted

To Verify that the Beneficiary Type has been Deleted:
- Click on the Search icon

- Enter the Beneficiary Type information
- Click on the Find icon

- The window will appear

Modify a Beneficiary Type
This screen requires allows the user to be able to define possible Beneficiary types with a tab at the bottom to define the different Benefit Shares per Beneficiary type. Some examples of beneficiary types include current wife, father, mother, child, guardian, ex-wife, etc. To MODIFY a Beneficiary Type, follow the steps below:
Navigation 
By default, you will be in Search Mode.
- Enter the information to be used as retrieval criteria in the appropriate field(s).
If you prefer to see the list of all Beneficiary Type, leave all fields blank. - Click on the Find icon
 . The list of Beneficiary Type meeting the retrieval criteria will appear.
 - Click on the Beneficiary Type you want to modify.
You will then be in Update/Delete Mode. - Make the necessary modification(s).
- Click on the Update icon
 at the bottom of the screen to save your modifications. A window will appear to confirm the modification. Click OK to confirm.
Benefit Share Per Beneficiary Type
Overview
This screen includes all of the information that a user will need to input data in order to prepare a Benefit Share per Beneficiary Type entry. ID code of the employee, beneficiary type, minimum and maximum ages for an employee to qualify for the benefit share per beneficiary type, the rate and the amount are all headings which must be defined by the user.
Navigation 
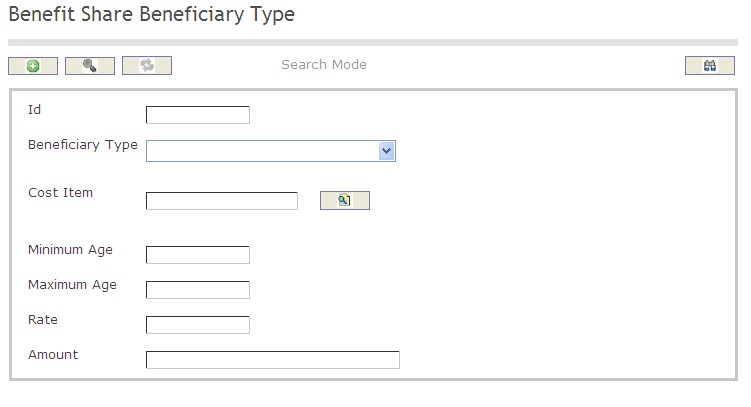
How to SEARCH:
- Enter the information to be used as retrieval criteria in the appropriate field (s). If you prefer to see a list of all Benefit Share Per Beneficiary Types, leave all fields blank.
- Click on the Find icon
 .
.
The Benefit Share Per Beneficiary Type screen includes the following fields:
| Report Fields | Description |
| ID | Unique identification code of the Benefit Share per Beneficiary Type |
| Beneficiary Type | The type of beneficiary associated to this benefit |
| Cost Item | The cost item associated to this benefit |
| Minimum Age | The minimum age required to receive this benefit share |
| Maximum Age | Specifies the maximum age in years of the beneficiary to receive this benefit. If this value is null means that the beneficiary will be receiving this benefit share until the benefit ends |
| Rate | The percentage over the benefit factor/amount to be granted to this beneficiary type |
| Amount | The amount of the benefit share |
Create a Benefit Share Per Beneficiary Type
Benefit Share Per Beneficiary Type includes all of the information that a user will need to input data in order to prepare a Benefit Share per Beneficiary Type entry. To CREATE a Benefit Share Per Beneficiary Type, follow the steps below:
Navigation 
By default, you will be in Search Mode.
- Click on the New icon
 (you will then be in Insert Mode).
 - Enter the new Benefit Share per Beneficiary Type information. Fields with an asterisk
 are mandatory fields.
 - Enter the ID, as required.
- ID: Unique identification code of the Benefit Share per Beneficiary Type.
- Select a Beneficiary Type from the drop-down menu.
- Beneficiary Type: The type of beneficiary associated to this benefit.
5. To enter the Cost Item data, if required, click on the Lookup icon  , click on the Find icon
  to retrieve the Cost Item list, then select the Cost Item.
- Cost Item: The cost item associated to this benefit.
6. Enter Minimum Age.
- Minimum Age: The minimum age required to receive this benefit share.
- Maximum Age: Specifies the maximum age in years of the beneficiary to receive this benefit. If this value is null means that the beneficiary will be receiving this benefit share until the benefit ends.
8. Enter Rate.
- Rate: The percentage over the benefit factor/amount to be granted to this beneficiary type.
9. Enter Amount.
- Amount: The amount of the benefit share.
10. Click on the Save icon  at the bottom of the Benefit Share per Beneficiary Type page to save your new Benefit Share per Beneficiary Type information. A window will appear to confirm.

Delete a Benefit Share Per Beneficiary Type
Benefit Share Per Beneficiary Type includes all of the information that a user will need to input data in order to prepare a Benefit Share per Beneficiary Type entry. To DELETE a Benefit Share Per Beneficiary Type, follow the steps below:
Navigation 
By default, you will be in Search Mode.
- Find the Benefit Share per Beneficiary Type you want to Delete
- Enter the information to be used as retrieval criteria in the appropriate field(s). If you prefer to see all Benefit Share per Beneficiary Types, leave all fields blank.
- Click Find

- Select the Benefit Share per Beneficiary Type you want to Delete
- Click on the Delete icon

- A window will appear asking you to confirm

- Click OK to confirm and delete the Benefit Share per Beneficiary Type.
- A window will be displayed confirming the Benefit Share per Beneficiary Type has been deleted

To Verify that the Benefit Share per Beneficiary Type has been Deleted:
- Click on the Search icon

- Enter the Benefit Share per Beneficiary Type information
- Click on the Find icon

- The window will appear

Modify a Benefit Share Per Beneficiary Type
Benefit Share Per Beneficiary Type includes all of the information that a user will need to input data in order to prepare a Benefit Share per Beneficiary Type entry. To MODIFY a Benefit Share Per Beneficiary Type, follow the steps below:
Navigation 
By default, you will be in Search Mode.
- Enter the information to be used as retrieval criteria in the appropriate field(s).
If you prefer to see the list of all Benefit Share per Beneficiary Types, leave all fields blank. - Click on the Find icon
 . The list of Benefit Share per Beneficiary Types meeting the retrieval criteria will appear.
 - Click on the Benefit Share per Beneficiary Type you want to modify.
You will then be in Update/Delete Mode. - Make the necessary modification(s).
- Click on the Update icon
 at the bottom of the screen to save your modifications. A window will appear to confirm the modification. Click OK to confirm.
Pension Category
Overview
This support entity contains all Pensions’ Categories defined by the employer.
Navigation
Human Resources ► Support Entities ► Retirement Management ► Pension Category
Pension Category Screen Fields
| Fields | Descriptions |
| Id | The unique Code of the Pension category. Can be given by the user. |
| Active | By default, it is marked as checked, it indicates that the Pension Category is available for use. If it is unmarked then it would be not available anymore to use. |
| Language | It allows the user to select the language to write the description. The default language is English. |
| Description | The user can write details description related to the Pension Category in the selected language. |