Employee Self Service
Overview
Employee Self-Service is designed to enable employees to access their personal information and make changes to non-payroll specific data. This includes enabling employees to complete training applications, travel requests and approval submissions, vacation leave (requests and approvals) and other requests as configured by the organization.
Objectives and Benefits
The Employee Self Service module can be configured so that employees access the FreeBalance (CSSS) Employee Self Service module online, via http or secure https connections.
Internal Job Board
The “Internal Job Board’ feature of Employee Self Serve allows employees to search for information about available positions on their own. Employees are able to lookup the positions and organizations they prefer using the lookup feature and can choose the language of their preference.
Career Planning
Another aspect of Employee Self-Serve is the Career Planning feature which allows employees to use tools to plan out the courses they would like to take, what types of skills they would like to acquire and aids them to fully layout a plan for their long term and short term professional goals.
Training
This aspect of Employee Self Serve allows employees to search information that they would like to receive on training that is available to them. There are three sub aspects to this and they are:
- Registered Training: Employees are able to view course statuses, costs, start dates, size, manager, provider, location, and other information.
- Apply for Training: Allows employees who know of a specific course to directly access the Employee Training Application
- ESS Course Catalog: Allows employees who do not know of a course specifically to search through the Training Course Catalog
ESS Disciplinary Case
Overview
The objectives of the Disciplinary Module is to ensure a fair and consisten approach to enforcing standards of performance and conduct. It provides a framework to guide the behaviour and conduct of civil servants. The module helps correct behaviour and encourage improvement among civil servants whose performance or conduct is unsatisfactory. It helps in resolving disciplinary cases fairly and as quickly as possible.
Navigation
Human Resources ► Employee Self Service ► ESS Disciplinary Case
ESS Disciplinary Case Screen Fields
| Fields | Description |
| Id | System generated, unique key. |
| Workflow Status | Workflow ststus of the ESS Disciplinary Case. |
| Date Opened | Default is system date. Can be changed by users. |
| Date Closed | Default is system date when the status is changed to a final state. |
| Is Grievance | Boolean flag for Grievance. |
| Grounds for Disciplinary Action | To indicate all the possible grounds for a disciplinary case. |
| Employee | Employee reference field. |
| Entered on behalf of | The employee who wishes to have a disciplinary case, not necessarily the employee doing the data entry, could be a supervisor or someone else. |
| Allow Modify Explanation | If the boolean flag is true system allows to modify explanation. |
| Language | Language use to enter the description fields. |
| Explanation | Detailed explanation of the dispute. |
| Employee Explanation | Employee's explanation. |
Financial Disclosure
Overview
Financial Disclosure is a module which will be a part of the FreeBalance Civil Servant Management, Human Resource family. It will be designed on the declaration and publication of information about revenues, financial commitments and assets of persons occupying political and other special government posts, as well as their close relatives. It will also meet the Regulations on the procedure, terms and the timing of the declaration of the revenues, financial commitments and assets of public servants (civil servants) and their close relatives, inventory, store returns and the publication of the information contained therein.
Financial Disclosure Declaration
Overview
This feature contains the information related with the personal, position and organizational information of the civil servant (e.g. address; position, institution) and also the information related with the number, period of declaration and status as well. The main concept is to enter the Employee ID, and the system automatically fills in the fields, using the information stored in the Employee, Organization and Position entities of the CSM.
Navigation
Human Resources ► Financial Disclosure ► My Declaration Form
Financial Disclosure Declaration screen fields and tabs
| Fields | Description |
| Code | Unique identifier, generated by system. This field is read-only |
| Workflow Status | Shows the present status of the Disclousre Status. This attribute takes one of the following values:
The default value is 'Created'. This field is read-only |
| Declaration Year | Reference to Declaration Year ID and automatically assigned by the system taking the value when Is Current Schedule is 'true'. This field is read-only |
| Employee | Reference to Employee ID. Can be selected by using the lookup function. |
| Declaration Type | Allows to select type of Declaration. This attribute takes one of the following values:
The default value is 'Current Employee’ This field is Read-only |
| Start Declaration Date | Contains the start date to declare. Automatically assigned by the system taking the value from Schedule Start Date attribute from Declaration Schedule Entity and allowing the user to modify it. This field must be greater or equal to Schedule Start Date and also be less or equal than Schedule End Date. |
| End Declaration Date | Contains the end date to declare. Automatically assigned by the system taking the value from Schedule End Date attribute from Declaration Schedule Entity and allowing the user to modify it. This field must be less or equal than Schedule End Date and also be gather or equal than Schedule Start Date. |
| Employee Assignment | Reference to Employee Assignment ID. Can be selected by using the lookup function. |
| Date Of Declaration Submission | Contains the Date when the Declaration was submitted. This field is read-only. |
| Expected Date Of Declaration Submission | Contains the Expected Date of Submission based on the Declaration type. This field is read-only. |
| Date of Declaration Confirmation | Contains the Date when the Declaration was confirmed. This field is read-only. |
| Is Declaration Submitted Late | Default value false. It is a flag used to specify if a Declaration was submitted late. This field is read-only. |
| Modified By | Reference to Declaration ID. This field is read-only. |
| Was Excluded | Default value false. It is a flag used to specify if the Declaration was excluded from the declaration analysis This field is read-only. |
| Had Incidents | Default value false. It is a flag used to detail the incidents found after declaration analysis. This field is read-only. |
| Total of Revenues | Contains the amount total of revenues from the declarant. Automatically calculated by the system after each revenue was saved (added, updated or deleted) in the Revenues Information entity, attribute Revenue Amount. This field is read-only. |
| Total Of Immovable Assets | Contains the total amount of immovable assets from the declarant. Automatically calculated by the system after each immovable asset was saved (added, updated or deleted) in the Immovable Assets Informationentity, attribute Ammount of Asset. This field is read-only. |
| Total Of Movable Assets | Contains the amount total of movable assets from the declarant. Automatically calculated by the system after each movable asset was saved (added, updated or deleted) in the Assets Information entity, attribute Amount of Asset. This field is read-only. |
| Total of Commitments | Contains the amount total of commitments from the declarant. Automatically calculated by the system after each commitment was saved (added, updated or deleted) in the Commitments Informationentity, attribute Amount of Principal Debt Repayment. This field is read-only. |
| Total of Commitments Unpaid | Contains the amount total of commitments unpaid from the declarant. Automatically calculated by the system after each commitment was saved (added, updated or deleted) in the Commitments Informationentity, attribute Amount of Principal Debt Balance. This field is read-only. |
| Revenue Information tab | Contains the information of the revenues declared in monetary terms and also includes the revenues received in form of assets. |
| Share Capital Asset Information tab | Contains the information of the share capital assets declared as an asset transferred in the authorized capital of economic entities to which the claim right can be applied. And also contains the information of asset transferred in a trust manager (while serving in public service). |
| Immovable Asset Information tab | Contains the information of the immovable assets declared. |
| Commitment Information tab | Contains the information of the financial commitments that the civil servant has acquired and currently is paying and declared as well. |
| Movable Asset Information tab | Contains the information of the movable assets declared. |
| Relative Information tab | Contains the information of the relatives (spouse, parents, children, brothers) of civil servant that depend financially on him. |
| Attachments tab | Allows to attach documents related with the declaration. |
Commitment Information tab
Overview
This entity contains the information of the financial commitments that the civil servant has acquired and currently is paying and declared as well.
Commitment Information tab screen fields
| Fields | Description |
| Sequence Id | Unique identifier for revenues information, automatically assigned by the system. This ID is unique per Declaration, re-starting the sequence with 1 for each Declaration. This field must be Read-only |
| Commitment | Reference to Financial Commitment Type ID |
| Source Of Commitment | Contains the name of the creditor or loan giver |
| Agreement Issue Date | Contains the date of issue of the agreement |
| Agreement Number | Contains agreement number that justify the source of commitment or the place where comes from. |
| Obligation Start Date | Contains the start date of obligation |
| Obligation Expiration Date | Contains the expiration date of obligation |
| Obligation Currency | Reference to Currency Code |
| Amount Of Obligation | Contains the amount of obligation |
| Amount Principal Debt Repayment | Contains the amount of principal debt repayment. It is Calculated from (Amount of Obligation * Percentage of Principal Debt/100). |
| Percentage Principal Debt Repayment | Contains the percentage of principal debt repayment. The value allowed must be between 0 and 100 . It is Calculated from (Amount of principal Of Debt Repayment * 100) / Amount of Obligation. |
| Amount Principal Debt Balance | Contains the amount of principal debt balance This attribute should be Read Only. It is calculated from Amount of Obligation - Amount of Principal Debt Repayment. |
| Percentage Principal Debt Balance | Contains the percentage of principal debt balance. The value allowed must be between 0 and 100. This attribute should be Read Only. It is calculated from ((Amount of Obligation - Amount of Principal Debt Repayment) / Amount Of Obligation) * 100 |
| Is Obligation Outside Country | Default value FALSE. Is a flag that will be used to indicate if the obligation is inside country (FALSE) or outside country (TRUE) |
| Country | Contains the country of the income. |
Immovable Asset Information tab
Overview
This entity contains the information of the immovable assets declared.
Immovable Asset Information tab screen fields
| Fields | Description |
| Sequence # | Unique identifier for revenues information, automatically assigned by the system. This ID is unique per Declaration, re-starting the sequence with 1 for each Declaration. This field must be Read-only |
| Asset | This entity contains the information related with the type of assets (immovable) that civil servants should declare as owners (e.g. house, apartment, villa, land, garage; building, block, workplace). Reference to Asset ID. Can be selected from the dropdown list. |
| Is Market Value | Defines if the Amount represents a Market Value. The Default Value is FALSE. |
| Asset Currency | Reference to Currency Code |
| Amount Of Asset | Contains the amount of asset declared. |
| Share Percentage | Contains the Percentage of Shares. The value allowed must be between 0 and 100 |
| Area In Square Meter | Contains the Area of the unmovable property (in square meters) |
| Agreement Type | Contains the type of agreement |
| Agreement Issue Date | Contains the date of issue |
| Property Registry Number | Contains the Property Registry Number |
| Is Location Foreign? | Default value false. Is a flag that will be used to indicate if the location of asset is inside country (false) or outside country (true) |
| Country | Contains the counry of asset. |
| Address | Contains the location of asset |
Movable Asset Information tab
Overview
This entity contains the information of the movable assets declared.
Movable Asset Information tab screen fields
| Fields | Description |
| Sequence Id | Unique identifier for revenues information, automatically assigned by the system. This ID is unique per Declaration, re-starting the sequence with 1 for each Declaration. This field must be Read-only |
| Movable Asset | This entity contains the information related with the type of assets (movable) that civil servants should declare as owners (e.g. forests, perennial plantings, automobiles light, trucks, agricultural equipment, furniture). Reference to Asset ID. Can be selected from the dropdown list. |
| Is Market Value | Defines if the amount of asset represents a Market Value. The Default Value is FALSE. |
| Asset Currency | Reference to Currency Code |
| Amount of Asset | Contains the amount of asset declared. |
| Percentage of Shares | Contains the Percentage of Shares. The value allowed must be between 0 and 100 |
| Agreement Type | Contains the type of agreement |
| Agreement Issue Date | Contains the date of issue |
| Location Outside Country | Default value false. Is a flag that will be used to indicate if the location of asset is inside country (false) or outside country (true) |
| Country | Contains the counry of movable asset. |
| Address | Contains the location of movable asset This field must be disabled if Is Location Outside Country is TRUE. |
Relative Information tab
Overview
This entity contains the information of the relatives (spouse, parents, children, brothers) of civil servant that depend financially on him.
Relative Information tab screen fields
| Fields | Description |
| Relative ID | Unique identifier as Personal Identification Code (PIN), allowing to the user fill it. This ID is unique per Declaration |
| Relative Name | Contains the name of the Relative |
| Relative Relation Degree | Contains the information of relative relation degree |
| Is Working | Default value false. Is a flag that will be used to define if relative is working |
| Place of work | Contains the name of the place where relative is working This field must be Disable when ‘Is Working’ is False |
| Relative Position | Contains the name of the relative’s position from place of work This field must be Disable when ‘Is Working’ is False |
| Revenues Information | Code of Revenues Information |
| Movable Assets Information | Code of Movable Assets Information |
| Immovable Assets Information | Code of Immovable Assets Information |
| Share Capital Assets Information | Code of Share Capital Assets Information |
| Commitments Information | Code of Commitments Information |
| Total of Revenues | Contains the amount total of revenues from the relative |
| Total of Immovable Assets | Contains the total amount of immovable assets from the relative |
| Total of Movable Assets | Contains the amount total of movable assets from the relative |
| Total of Commitments | Contains the amount total of commitments from the relative |
| Total of Commitments Unpaid | Contains the amount total of commitments unpaid from the relative |
Revenue Information tab
Overview
This entity contains the information of the revenues declared in monetary terms and also includes the revenues received in form of assets.
Revenue Information tab screen fields
| Fields | Description |
| Sequence Id | Unique identifier for revenues information, automatically assigned by the system. This ID is unique per Declaration, re-starting the sequence with 1 for each Declaration. This field must be Read-only |
| Form Of Revenue | This attribute could take one of the following values:
Default value is 'In Form of Cash'. |
| Revenue Type | Reference to Revenue ID. Can be selected from the dropdown list. |
| Immovable Asset | Reference to Immovable Asset ID. Can be selected from the dropdown list. |
| Movable Asset | Reference to Movable Asset ID. Can be selected from the dropdown list. |
| Is Market Value | Defines if the Amount represents a Market Value. The Default Value is FALSE. |
| Asset Currency | Reference to Currency Code. Can be selected from the dropdown list. |
| Amount | Contains the revenue amount declared. |
| Agreement Type | Contains the type of agreement |
| Revenue Source | Contains the name of individual/organization which paid as a source of revenue |
| Is Revenue Outside Country | Default value FALSE. Is a flag that will be used to indicate if the revenue is inside country (FALSE) or outside country (TRUE) |
| Country | Contains the country of the income. It is required that will be implemented as a Combo Box. |
| Agreement Number | Contains agreement number that justify the source of revenues or the place where comes from. This field must be DISABLED If Agreement Type is NULL. |
| Agreement Issue Date | Contains the date of issue This field must be DISABLED If Agreement Type is NULL. |
Share Capital Asset Information tab
Overview
This entity contains the information of the share capital assets declared as an asset transferred in the authorized capital of economic entities to which the claim right can be applied. And also contains the information of asset transferred in a trust manager (while serving in public service).
Share Capital Asset Information tab screen fields
| Fields | Description |
| Sequence # | Unique identifier for revenues information, automatically assigned by the system. This ID is unique per Declaration, re-starting the sequence with 1 for each Declaration. This field must be Read-only |
| Is Share Capital? | Default value TRUE. Is a flag that will be used to indicate it is only a Share Capital. If this is TRUE Is Trust Manager Should be FALSE. |
| Is Trust Manager | Default value FALSE. Is a flag that will be used to indicate it is only a Trust Manager. if this is TRUE Is Share Capital Should be FALSE. |
| Is Immovable Asset? | Default value FALSE. Is a flag that will be used to indicate if the Asset is Immovable (false) or Movable (true) |
| Owned Movable Asset Type | This entity contains the information related with the type of assets (movable) that civil servants should declare as owners (e.g. forests, perennial plantings, automobiles light, trucks, agricultural equipment, furniture). Reference to Asset ID. Can be selected from the dropdown list. |
| Owned Movable Asset Type | This entity contains the information related with the type of assets (immovable) that civil servants should declare as owners (e.g. house, apartment, villa, land, garage; building, block, workplace). Reference to Asset ID. Can be selected from the dropdown list. |
| Is Market Value? | Defines if the Asset Value represents a Market Value. The Default Value is FALSE. |
| Asset Currency | Reference to Currency Code |
| AssetValue | Contains the Asset Value |
| Share Percentage | Contains the Percentage of Shares from Asset Value The value allowed must be must be greater than zero (0) and less or equal than one hundred (100) |
| Economic Entity Number | Contains the identification number of the economic entity |
| Is Location Foreign? | Default value FALSE. Is a flag that will be used to indicate if the location of asset is inside country (false) or outside country (true) |
| Country | Contains the country of asset. |
| Address | Contains the location of the economic entity |
| Economic Entity Name | Contains the Name of the economic entity |
| Trust Manager Number | Contains the identification number of the trust manager |
| Trust Manager Name | Contains the identification name of the trust manager |
| Trust Manager Issue Date | Contains the date of issue of trust manager |
| Trust Manager Expiration Date | Contains the date of expiration of trust manager |
| Trust Manager Agreement Number | Contains the number of agreement of trust manager |
Personal Information
Navigation 
My Payslip Report
View your paystub:
To view your Payslip
Go to Menu -> Employee Self Service -> Personal Information -> My Payslip Report
1. Select the Fiscal Year: 2018
2. Select the Pay Code: Bi-Weekly
3. Select the Pay Period: Select a period between 1 and 21
Note. The Institution and Employee Number fields will display automatically since this information comes from the employee file.
Example:

4. Click on the PDF  icon to generate your payslips for the period selected. The PDF report will be download at the bottom of the screen.
5. Click on the PDF to open your Payslip Report. 
Example:

Personal File
Overview
The Personal File screen can be used by an employee to modify / update personal information on their employee profile. Some information will not be editable, or are only editable with approval from a manager. Personal contact information is located in the Personal File window on the Self Service application.
Update your personal contact information
Go to Menu > Employee Self Service > Personal Information > Personal File
1. To Add new contact information
a. Click on the New  icon. The Contact form will display.
b. Enter the new contact information.
Example:
· IsMain: Put a checkmark in the box;
· Contact Type: Electronic Mail;
· Contact Location Type: Work;
· Contact Value: your email address;
· Description: Work email
c. Click on the Save and Return  icon.
icon.
d. Click on the Update  icon to save the changes.
2. To Update the personal contact information
Go to Contact  Tab
Tab
a. Click on the hyperlink to display the Contact Form. Make the required changes.
b. Click on the Update and Return  icon.
icon.
c. Click on the Update  icon to save the changes.
3. To Add New Address:
a. Click on the New  icon. The Address form will open.
b. Enter the new Address.
c. Check is Main? Leave blank.
d. Click on the Lookup  icon to select the Region.
e. Click on the Find  icon.
icon.
Example:
· Region: North America
· Country: Canada (from the dropdown menu)
· Address Type: Home
· Address: 100 Rue principale;
· Postal Code: 8999
f. Click on the Save and Return  icon.
icon.
g. Click on the Update  icon to save the changes.
4. To Update the Address information:
Go to Address  Tab
Tab
a. Click on the hyperlink to display the Address Form will open.
b. Make the required changes.
Example:
· Address Type: Home;
· Address: 125 pie street.
c. Click on the Update and Return  icon.
icon.
Modify Personal File
The Personal File screen can be used by an employee to modify / update personal information on their employee profile.
To MODIFY a Personal File, follow the steps below:
Navigation 
By default, you will be in Insert Mode.
- Enter new Personal information, if required. Fields with an asterisk
 are mandatory fields.
 - Code will be automatically generated by the system
- Code: Unique identification code of the Employee
3. Select the Name Prefix from the drop down menu, if required.
- Name Prefix: prefix of the employees name
4. Enter First Name, Middle Name , and Last Night, if required.
- First Name: first name of employee
- Middle Name: middle name of employee
- Last Name: last name of employee
5. Select Language from the drop down menu.
- Language: language used
6. Enter Birth Date, if required.
- Birth Date: the day the employee was born. To enter the date, click on the Calendar icon
 and select the date.
7. Enter Place of Birth, if required.
- Place of Birth: country that the employee was born
8. Select Gender and Marital Status from the drop down menus, if required.
- Gender: gender of the employee
- Marital Status: defines whether the employee is Single, Married, Divorced, etc.
9. Enter Social Number, if required.
- Social Number: social number of employee
10. Institution will be automatically generated by the system.
- Institution: the institution where the employee works
11. Choose Country of Origin, Citizenship, and Residency from rop down menus if required.
- Country of Origin: country of origin of employee.
- Citizenship: country that the employee is a citizen in.
- Residency: country where the employee lives.
12. Old Employee Number will be automatically generated by the system.
- Old Employee Number: previous employee number for the employee
13. Enter the Tax Identification Number, if required.
- Tax Identification Number: Tax Identification Number.
14. Click the Is PaySlip Sent Via E-mail checkbox, if required.
- Is PaySlip Sent Via E-mail: if checked, then the employees payslip will be sent to their email
15. To enter the Currency, if required, click on the Lookup icon  ,click on Find icon
  to retrieve the Currency information, then select the Currency.
- Currency: currency used by the employee
16. Date Hired, Probation End Date, Permanent, Seniority, Commitment Date, , Retirement Date, Departure Date, and Departure Reason will be automatically generated by the system.
- Date Hired: the date the employee was hired
- Probation End Date: the date where the employee's probation ends
- Permanent: date the employee begins being permanent
- Seniority: The date that seniority takes effect.
- Commitment Date: The date the employee has been officially committed as an employee]
- Retirement Date: Actual retirement date of the employee.
- Departure Date: The date the employee left as an employee.
- Departure Reason: Departure code retrieved from the Exit Interview
17. Enter the Anticipated Retirement Date, if required.
- Anticipated Retirement Date: the date the employee anticipates retirement
To ADD a Skill:
Click on the Skill tab, , then the Lookup icon
  . Click on the Find icon
 to retrieve the Skill list, then select the Skill.
To ADD an Education:
Click on the Education tab, , then the Lookup icon
  . Click on the Find icon
 to retrieve the Education list, then select the Education.
To ADD a Spoken Language:
Click on the Spoken Languages tab, , then the Lookup icon
  . Click on the Find icon
  to retrieve the Spoken Languages list, then select the Spoken Language.
To ADD an Employee Association:
Click on the Employee Associations tab, , then the Lookup icon
  . Click on the Find icon
 to retrieve the Employee Association list, then select the Employee Association.
To ADD an Employee Certificate:
Click on the Employee Certificates tab, , then the Lookup icon
  . Click on the Find icon
 to retrieve the Employee Certificate list, then select the Employee Certificate.
To ADD a Contact:
Click on the Contact tab, , click the New icon
 and enter the new Contact information (refer to Contact for more information).
To ADD an Address:
Click on the Address tab, , click the New icon
 and enter the new Address information (refer to Address for more information).
To ADD an Attachment:
Click on the Attachments tab, , click the New icon
  and enter the new Attachment (refer to Attachments for more information).
To ADD Payment Information:
Click on the Payment Information tab, , click the New icon
 and enter the new Payment Information (refer to Payment Information for more information).
To ADD a Medical Form:
Click on the Medical Form tab, , click the New icon
 and enter the new Medical Form information (refer to Medical Form for more information).
1. Create or retrieve as much information under each tab as required.
2. Click the individual Select Checkbox(es), under the required tabs to select and de-select the created or retrieved information, or click the Select All icon  or Unselect All
  icon, to select or de-select all the created or retrieved information, if required.
3. Click the Remove icon  to remove the selected created or retrieved information, if required.
4. Repeat steps 1 to 3 as required for each tab.
Click on the Update icon  at the bottom of the screen to save your modifications. A window will appear to confirm the modification. Click OK to confirm.

My Assignments
Overview
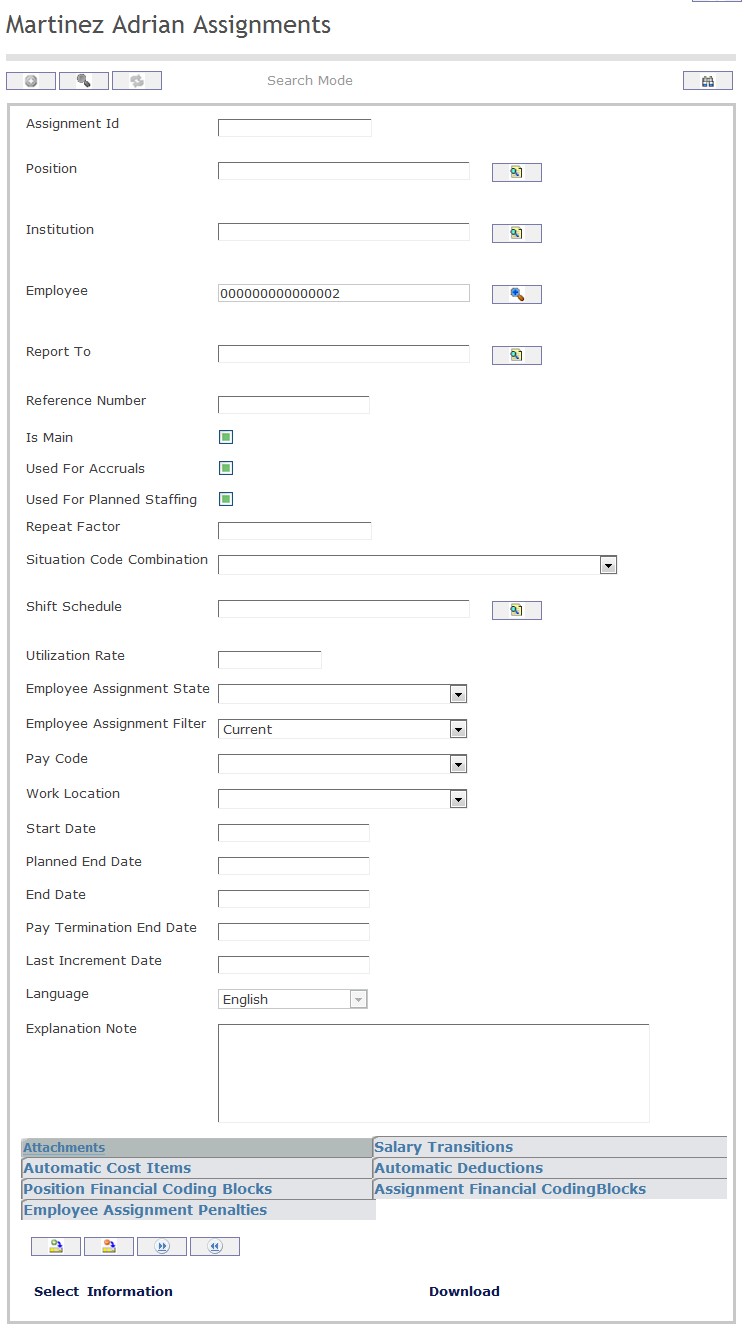
The user can access all the related information associated to their assignment. As well, the user can search on their Assignment history as well as their current and future assignments.
Navigation
How to SEARCH:
- Enter the information to be used as retrieval criteria in the appropriate field (s). If you prefer to see a list of all of your Assignments, leave all fields blank
- Click on the Find icon

The Employee Assignment screen includes the following fields:
| Field | Definition |
|
Assignment ID | System generated unique identification number of the assignment. | |
| Position | Employee Position. | |
| Institution | Institution. | |
| Employee | Employee Unique Identification Code. | |
| Report To | Identification of whom the employee reports to. | |
Reference Number | Reference Number for paper trail, if required. | |
| Is Main | If checked, indicated that the assignment is the main assignment. | |
Used For Accruals | If checked, indicated that the assignment is used for accruals generation. | |
| Used For Planned Staffing | If checked, indicates that the assignment is for planned staffing. | |
| Repeat Factor | Repeat Factor used for forecasting purposes. | |
| Hours Per Week | Calculated number of hours worked per week. | |
| Utilization Rate | Percentage of effort for the assignment. | |
| Employee Assignment State | State of the assignment (CREATED, APPROVAL REQUEST, APPROVED, REJECTED, CANCELLED). | |
| Employee Assignment Filter | Assignment Filter Indicator (ALL, CURRENT, FUTURE, PAST). | |
| Pay Code | Employee Pay Code. | |
| Work Location | Work location of the employee. | |
| Start Date | Assignment start date. | |
| Planned End Date | Estimated end date of the assignment. | |
| End Date | End date of the assignment. | |
| Pay Termination End Date | Determines when the last pay cheque will be paid. Earnings will not be calculated passed this date. | |
| Situation Code Combination | Situation Code Combination associated to the assignment, such as indeterminate full-time, determinate part-time. | |
| Shift Schedule | Shift Schedule associated to the assignment, including shift hours, number of working days per week, and statutory holidays. | |
| Language | Language used | |
| Explanation Note | Enter explanation |
Public Documents
Overview
Public Documents are any type of information that is published for public knowledge. These documents can be uploaded into the system and viewed by users. All documents that are uploaded and marked as public can be viewed in the Public Documents screen under Employee Self-Service. Users may also download any of these documents for their own reference.
Navigation
Human Resources ► Position Management ► Public Documents
Public Documents Filter Fields
| Fields | Description |
| Code | Unique identification code, manually entered by users |
| Active | If checked, the Public Documents can be used throughout the application. |
| Language | Language in which document is written |
| Description | Description or additional information on the document. |
Review Promotion
Overview
This screen holds the reviewers (people who participate but don't make final decision) of the promotion and their comments.
How to SEARCH:
- Enter the information to be used as retrieval criteria in the appropriate field (s). If you prefer to see a list of all Review Promotions, leave all fields blank.
- Click on the Find icon
 .
.
The Review Promotion screen includes the following fields:
Report Fields | Description |
Code | Unique identification code of the Review Promotion |
Agree | If agreed, reviewer agrees to the employee's proposed promotion. By default, this field is checked |
Commentary Date | This is a view only date. It is the System date and it is not editable. Provided when reviewer provides commentary |
Promotion Proposal | Holds the promotion proposal information for a given employee |
Reviewer | Employees (senior to employee being considered) who review the promotion request and provide commentary for the Approver and Requestor |
Language | Language used |
Comment | Commentary by the designated reviewer on the proposed employee's promotion |
Update a Review Promotion
To UPDATE a Review Promotion, follow the steps below:
- Enter the information to be used as retrieval criteria and click on the Find icon
 .
. - Select the Review Promotion
- Enter comments and attachments as required.
- Click on the Update icon
 at the bottom of the screen to save your updates. A window will appear to confirm the modification. Click OK to confirm.

Career Planning
Navigation
Career Plan Chart
Overview
The Career Plan Chart is based on the established career paths as defined by the Civil Service authorities. It is an illustration of the steps an employee will need to take in order to achieve the success in which they are looking for during the duration of their career.
Navigation 
An example of the Career Plan Chart is illustrated below.

Click on the  icon to bring up a list of career standings as defined in the Career Standing screen found under the Succession Planning tab in Employee Management. The list will be displayed as follows:

Select a Career Standing from the drop-down menu, and click the  icon to accept the choice, or the
  icon to cancel the function.
Click the ![]() icon to view the saved career paths and click the
icon to view the saved career paths and click the  icon to view the career plan chart in full-screen view.
Click the  icon to save the career plan chart.
My Appraisals
Overview
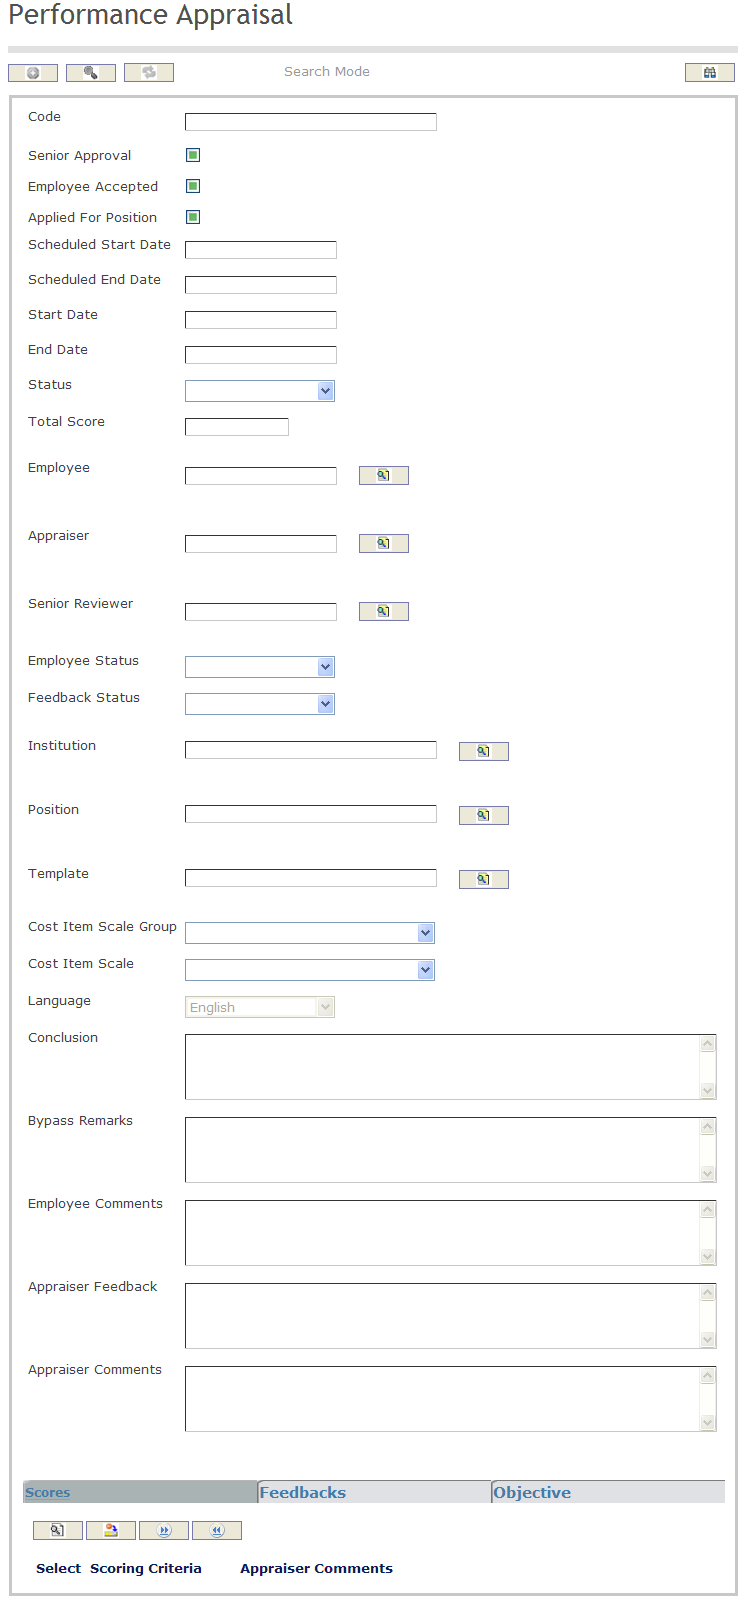
Performance appraisals integrate a company's vision with an employees job performance. In addition, performance appraisals are used to provide personnel evaluations on individual employee's. In My Appraisals, the user can access all of their performance appraisals. The user can search on their appraisal history as well as their current and future appraisals.
Navigation 
How to SEARCH:
- Enter the information to be used as retrieval criteria in the appropriate field (s). If you prefer to see a list of all performance appraisals, leave all fields blank.
- Click on the Find icon
 .
.
The Performance Appraisals screen includes the following fields:
Fields | Definition |
| Code | Unique identification code of the Performance Appraisal Template. |
| Senior Approval | If checked, then senior management approved. |
| Employee Accepted | If checked, then the employee accepted the performance appraisal. |
| Apply for Position | If checked, then the employee is applying for a position. |
| Scheduled Start Date | Date at which the performance appraisal process is scheduled to start. generated automatically. |
| Scheduled End Date | Date at which the performance appraisal process is scheduled to end, generated automatically. |
| Start Date | Actual start date of the performance appraisal. |
| End Date | Actual end date of the performance appraisal. |
| Status | Current status of the performance appraisal, generated automatically. Possible values are: bypassed, finished, in progress, late, not finished, open, scheduled. Initially the Performance Appraisal Status is set to open. When the system reaches the Scheduled Start Date, the status changes to Scheduled. When the system reaches the Actual Start Date, the Status changes to In Progress. When the first Performance Appraisal Score or Performance Appraisal Feedback is filled out, the status needs to change to In Progress and if the Actual Start Date is still blank, it should be updated with the system date. If the Actual Start Date is reached and the status is still Scheduled, the Status changes to Late. If Senior Approval and Employee Accepted are checked, the Status is set to Finished, otherwise, if the Senior Approval or Employee Accepted is not checked, and the system date reached the Scheduled or Actual End Date, the Status changes to Not Finished. |
| Total Scores | Final score of the performance appraisal. |
| Employee | Employee ID of the employee undergoing the performance appraisal. |
| Appraiser | Employee ID of the appraiser. |
| Senior Reviewer | Senior employee who approves the performance appraisal. |
| Employee Status | Current employment status of the employee, generated automatically. Possible values are: active, not started, and review ready. |
| Feedback Status | Current status of the peer feedback, generated automatically. Possible values are finished, not started, no peer feedback, partial feedback, peers selected. |
| Institution | Institution of the employee. |
| Position | Position that the employee currently holds. |
| Template | Template that will be used for the performance appraisal. |
| Cost Item Scale Group | Salary Scale of the Employee. |
| Conclusion | Final comment from the appraiser. |
| Bypass Remarks | Note on why the employee was bypassed. |
| Employee Comments | Area to give employee opportunity to comment on any aspect of the review. |
| Appraiser Feedback | Area for the appraiser to provide a consolidated feedback based on colleague feedback. |
| Appraiser Comments | Area for the appraiser to provide his/her own feedback. |
Appraisal Assigned to Me
Review a Performance Agreement:
Overview
Within Employee Self Service, an employee may be asked to conduct feedback for another employee's performance appraisal.
To review my Performance appraisal
Go to Menu -> Self Service -> Performance Appraisal -> Appraisal Assigned to Me
1. Click on the Find  icon. Your Performance Appraisal will be displayed.
2. It is possible to enter a comment in the Employee Comments field.
3. Once completed, click on the Update  icon.
icon.
To do a Self-assessment (or to evaluate a peer or a subordinate)
Go to Menu -> Self Service -> Performance Appraisal -> Appraisal Assigned to Me
1. Click on the Find  icon.
icon.
2. Enter scores for each scoring criteria previously defined.
3. Click on the Scores Tab, an select a scoring criteria. A new window will display.
4. Enter the score in the score field.
5. Enter the comments in the Feedback Box.
6. Click on the Update and Return  icon. Do the same for each scoring criteria.
7. Once completed, click on the Update  icon.
icon.
Example:

Note. The Appraiser waits until the employee himself and the peers have completed the assessments before sending it to the Senior Reviewer.
My Career Plan
Overview
My Career Plan enables employees to manage their careers aspirations by identifying the steps necessary for them to achieve it. Employees can maintain multiple career plans, giving them the flexibility insofar as allowed by the public service, to aspire to specific positions based on the mandatory and optional skills needed by each position in the career plan.
Navigation 
How to SEARCH:
- Enter the information to be used as retrieval criteria in the appropriate field (s). If you prefer to see a list of all My Career Plans, leave all fields blank.
- Click on the Find icon
 .
.
The My Career Plan screen includes the following fields:
| Report Fields | Description |
| ID | Unique identifier. Setup parameter to determine if entered by user or system generated. When system generated, it will be left padded with zeros |
| Active | Check-marked by default. When not check-marked, the record with this value is not available for editing anymore |
| Employee | The person that is having the career path setup on this screen |
| Target Career | Employee selects the desired career standing and it could be any level |
| Date Entered | Original date when this record was entered. Defaults to current date and it is non-editable |
| Target Date | Target date employee hopes to achieve the desired position |
| Current Employee Position | Name of current employee position that the employee is in |
| Language | Language used |
| Notes | General employee notes on this path |
Training
Overview
Training is a key enabler to increase public service capacity. It provides the groundwork for increasing the effectiveness of the civil service and is a key component of any public administrative reform initiative. In Employee Self Service, the user can access their specific training information as well as search and apply for available training courses.
My Training Course Applications
Overview
This feature contains the application for a training course. Employees who want to attend a specific course fill out applications here.
Navigation
Human Resources ► Employee Self Service ► Training ► My Training Course Applications
My Training Course Applications screen fields
| Fields | Description |
| Code | Unique identifier. Depending on parameter configuration, value is entered by users or automatically generated by the system. |
| Workflow Status | Workflow Status of the My Training Course Applications entity. |
| Exempt From Qualifications | Check box for exemption from mandatory qualifications. False by default. |
| Employee | Employee requesting the training. |
| Training Course | Training course employee is applying to. |
| Creation Date | Training course creation date. |
| Language | Language used to enter the description fields. |
| Exemption Note | Holds notes on employee's exemption from prerequisite qualifications |
| Status Remarks | If rejected, approver must provide a reason. If cancelled, employee must provide a reason. |
| Request Summary | Employee's "reason" for applying to attend this course. |
| Training Course Application Documents Tab | Tab to add one or more documents. |
| Attachments Tab | Tab to attach any supporting file regarding the Training cource application. |
Attachment Tab
Overview
System allows to attach files to support the Training Cource Applications.
Attachment screen Fields
Field | Description |
ID | Consecutive number auto generated by the system. It will be unique within the system. |
| Attachment Classification | Reference to attachment classification. |
Language | Country specific language for the title and description. |
Title | Title of the Attachments. |
Description | Description of the attachments. |
Attachment | System allow to selete and upload supporting file. File type can be: pdf, doc, xls, jpg, etc. |
Date Time | Date and Time of the last operation performed on the attachment document. Visible for the user. Automatically assigned by the system. |
User | Last user who uploaded or updated the document. Visible for the user. Automatically assigned by the system. |
Language | Mandatory field, language of the document. The system will suggest the default language; however the user can change such language. |
Registered Training
Overview
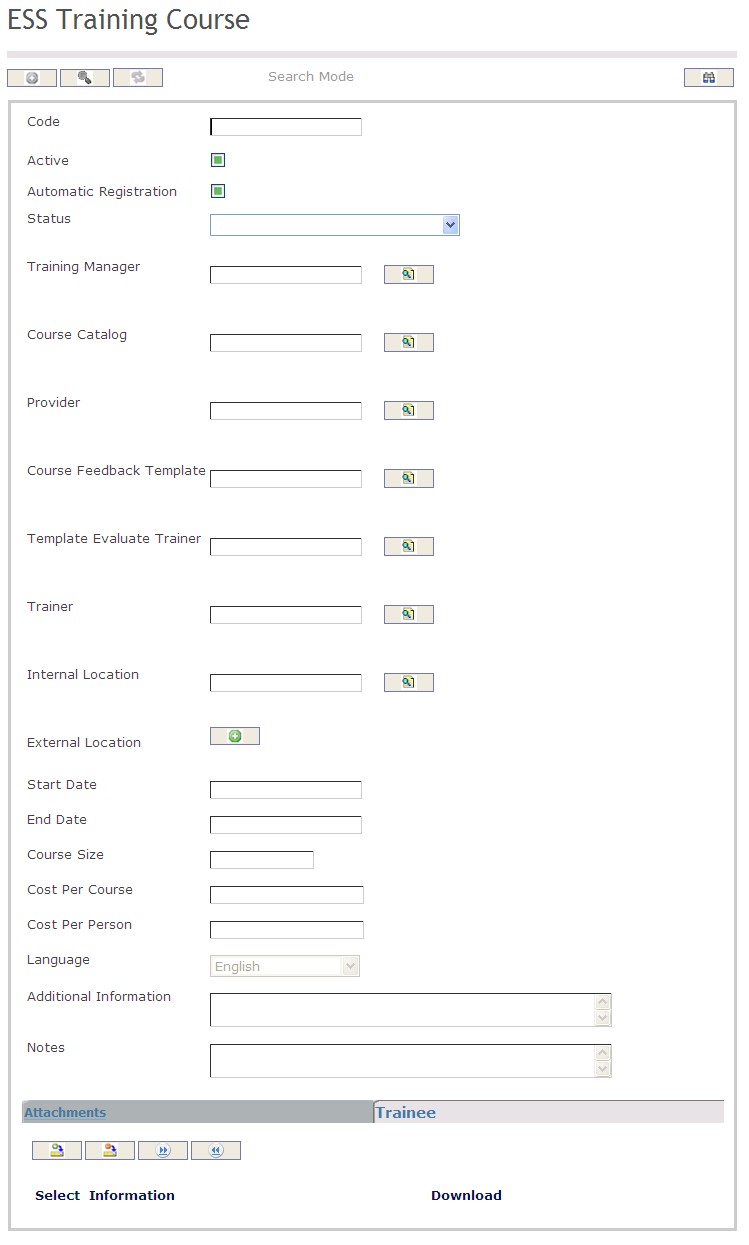
Registered Training allows the user to view courses they have already taken, courses they are currently in or have been accepted to and courses they have applied to but have not yet been accepted for.
Navigation
How to SEARCH:
- Enter the information to be used as retrieval criteria in the appropriate field (s). If you prefer to see a list of all training courses, leave all fields blank.
- Click on the Find icon
 .
.
The Training Course screen includes the following fields:
| Field | Definition |
| Code | Unique identification code of the Training Course. |
| Active | Active Status - if checked, Training Course is available. |
| Automatic Registration | if checked, Indicates that qualified employees who register for this training course are automatically accepted on a first-come, first-serve basis. |
| Status | The current status of the training course |
| Training Manager | Employee ID of the person who will be providing evaluations on the Trainee. |
| Course Catalog | Catalog that contains the training courses. |
| Provider | The organization which will provide the training course. |
| Course Feedback Template | Templates that are used by employees ("trainees") for providing feedback on the course that they have attended. |
| Template Evaluate Trainer | Template used to evaluate the trainer. |
| Trainer | Employee ID of the person who will be conducting the course and providing evaluations on the Trainees. |
| Internal Location | Location where the course normally occurs. |
| External Location | External location of the course. |
| Start Date | Date at which Training Course will start. |
| End Date | Date at which the Training Course will end. |
| Course Size | The number of trainees that can attend the Training Course |
| Cost Per Person | Cost for the course per person. |
| Language | Language used. |
| Additional Information | Description of the Training Course that is more specific than the generic description found in the Training Course Catalog. |
| Notes | Notes on the course (for example, if canceling) |
Trainee Evaluation
Overview
This feature stores evaluation information on the person who is taking the course.
Navigation
Human Resources ► Employee Self Service ► Training ► Trainee Evaluation
Trainee Evaluation screen fields and Tabs
| Fields | Description |
| Code | Unique identifier. Parameter configuration determines if it is entered by user or system generated. |
| Training Application | The training application id. |
| Training Course | The training course the employee registered for |
| Course Attended | Indicates if the participant attended the course. Default is Yes. |
| Result Score | The mark given to the Trainee when the course ends (based on exams, quizes, etc.). This field is entered by users. |
| Course Result | "Excellent", "Very Good", "Standard", "Poor", Not Applicable". Default value is Standard. Provides information for general subjective perception. |
| Status | Possible values are: Scheduled, Training Started, Training Ended, Waiting Feedback, Closed, Cancelled, Trainee did not complete. Users can manually change the training status to Trainee did not complete. All the other status' are set by the workflow of the training course. |
| Evaluation Detail | Tab to add Evaluation Detail. |
Evaluation Detail
Overview
Tab to attach evaluation details
Evaluation Detail screen fields
| Fields | Description |
| Is Evaluation Positive | Check box for indicating Positive Evaluation. |
| Evaluation Rank | Rank of the Evaluation. |
| Training Feedback Criteria | Collection of course feedback to be filled out by Trainee once the course is completed. |
| Evaluation Text | Description fields to add any note about Evaluation. |
Trainee Feedback
Overview
This entity contains the Trainee's (employee's) evaluation of the training course, using a training feedback template as defined by the course creator.
Navigation
Human Resources ► Employee Self Service ► Training ► Trainee Feedback
Trainee Feedback screen fileds and tabs
| Fields | Description |
| Training Application | Training Course that the user (as a trainee) has taken. If the training course is still ongoing, the course is not available for edit. |
| Trainee | Trainee name . |
| Status | Pending, Completed, Rejected. Default is Pending. |
| Trainee Course Feedback Tab | Collection of course feedback to be filled out by Trainee once the course is completed. |
| Trainee Trainer Feedback Tab | Collection of course feedback (designed to evaluate trainer) to be filled out by Trainee once the course is completed. |
Apply for Training
Overview
Users who are interested in attending a training course must apply to the desired course. Users who want to attend the course will have to fill out the training request application form and submit it to the appropriate personnel for review and authorization.
Navigation
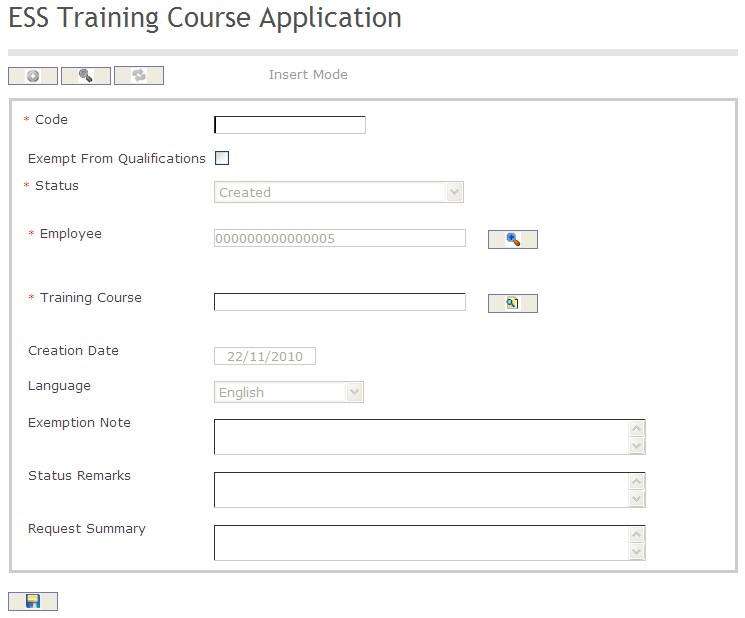
The Training Course Application screen includes the following fields:
| Field | Definition |
| Code | Unique identification code of the Training Course Application |
| Exempt From Qualifications | If checked, then the employee is exempted from mandatory qualifications for the requested Training Course |
| Status | Status of the application. |
| Employee | Employee requesting the training. |
Training Course | Training Course the employee is applying to. |
| Creation Date | Date at which the application was created. |
| Language | Language used. |
| Exemption Notes | Reason why the employee is exempted from mandatory qualifications. |
| Status Remarks | If employee is rejected, approver must provide a reason. |
| Request Summary | Employee's reason for applying to attend this course. |
Create a Training Course Application
Navigation
By default, you will be in Insert Mode.
- Enter the new Training Course Application information. Fields with an asterisk
 are mandatory fields.
 - The Code will be automatically generated. Click on the Exempt From Qualifications checkmark, if required.
- Code: Unique identification code of the Training Course Application.
- Exempt From Qualifications: If checked, then the employee is exempted from mandatory qualifications for the requested Training Course.
4. The Status will be automatically generated.
- Status: Status of the application.
5. The Employee field will be automatically generated with the user i.d.
- Employee: Employee requesting the training.
6. To enter a Training Course click on the Lookup icon  , click on Find icon
  to retrieve the Training Course list, then select the Training Course.
- Training Course: the Training Course the employee is applying to.
7. The Creation Date will be automatically generated.
- Creation Date: Date at which the application was created.
8. Select the Language as required.
- Language: Language used.
9. Enter Exemption Notes, Status Remarks and Request Summary, if required.
- Exemption Notes: Reason why the employee is exempted from mandatory qualifications.
- Status Remarks: If employee is rejected, approver must provide a reason.
- Request Summary: Employee's reason for applying to attend this course.
Click on the Save icon  at the bottom of the Training Course page to save your new Training Course information. A window will appear to confirm.
ESS Course Catalog
Overview
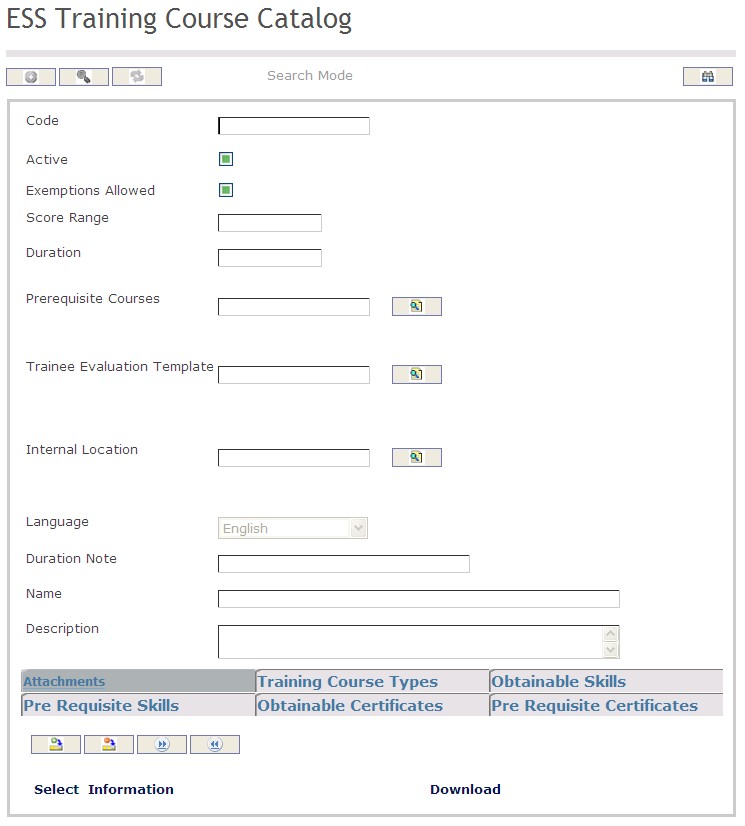
In this application the training course catalog contains information about the courses offered to employees. This is where users will view details about the course including start date, end date, trainer, location, prerequisite courses and other course information.
Navigation
How to SEARCH:
- Enter the information to be used as retrieval criteria in the appropriate field (s). If you prefer to see a list of all training courses, leave all fields blank.
- Click on the Find icon
 .
.
The Training Course screen includes the following fields:
| Field | Definition |
| Code | Unique identification code of the Training Course. |
| Active | Active Status - if checked, Training Course is available. |
| Exemptions Allowed | if checked, Indicates that employees may request exemptions from course prerequisite skills and certificates. |
| Score Range | Top value of possible score that should be given on this course. |
| Duration | Duration of the training course. |
| Prerequisite Courses | The prerequisite courses are needed before taking the training course. |
| Trainee Evaluation Template | Templates that are used by trainer to evaluate trainee on the course that they have attended. |
| Internal Location | Location where the course normally occurs. |
| Language | Language used. |
| Duration Note | Short description of duration. |
| End Date | Date at which the Training Course will end. |
| Name | Name of the Training Course. |
| Description | Description of the course. |
| Attachments | Attachments related to the course. |
| Notes | Notes on the course (for example, if canceling) |
| Training Course Types | Course type that specified course falls under. |
| Obtainable Skills | Skills attendants can obtain when finishing course. |
| Prerequisite Skills | Skills needed to enroll in the course. |
| Obtainable Certificates | Certificate may be obtainable when finishing a course. |
| Prerequisite Certificates | Certificates required to enroll the in course. |
Forms and Requests
Overview
This is where the user will find time sheet, leave request and travel request forms to fill out and submit as required.
Navigation
My Accumulated Benefit Summary
Overview
This feature shows summary of all Accumulated Benefit by the employee during a fiscal year.
Navigation
Human Resources ► Employee Self Service ► Forms and Requests ► My Accumulated Benefit Summary
My Accumulated Benefit Summary Screen Fields and Tabs
| Fields | Description |
| Employee | Shows the employee name. |
| Fiscal Year | Fiscal year of the accumulated benefits. |
| Accumulated Benefit | Lookup for search accumulated benefits. |
| Details | Details of the accumulated benefits. |
Time Sheets
Overview
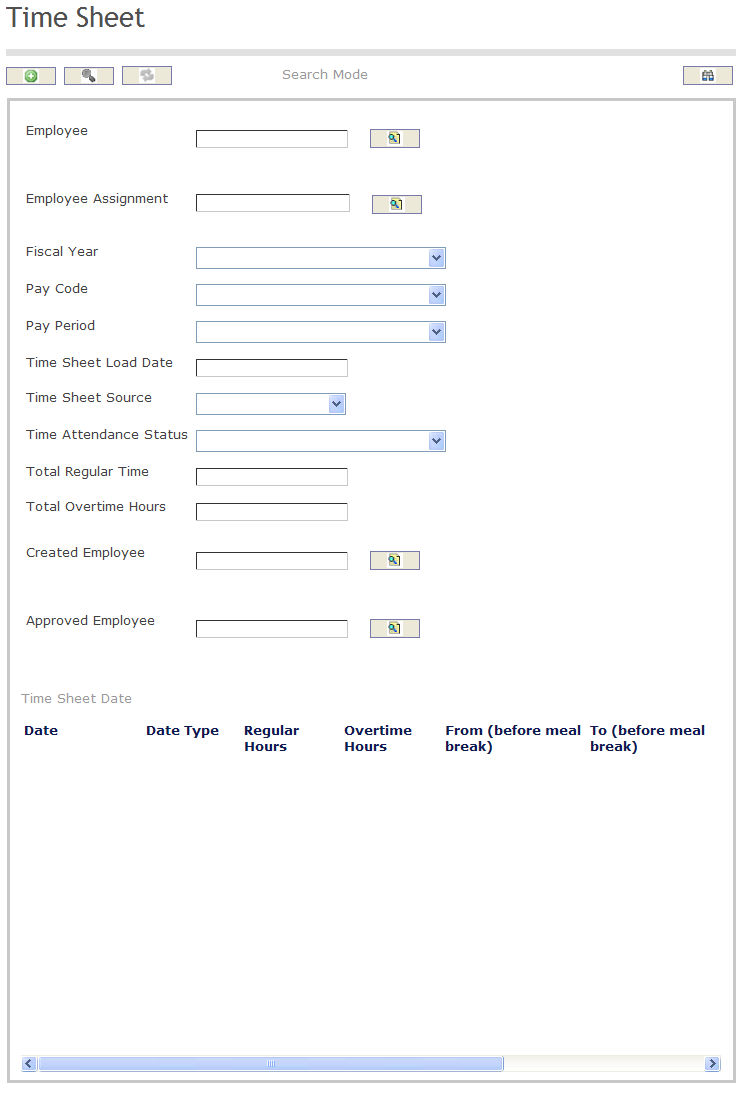
Time Sheet is a method for recording the amount of a worker's time spent on each job. Time sheets record the start and end time of tasks and durations (i.e. the duration before & after meal breaks). The Time Sheet also contains a detailed breakdown of tasks accomplished throughout the project or program. The information entered in the Time Sheet is generally used for payroll, client billing, and increasingly for project costing, estimation, tracking and management.
Navigation
How to SEARCH:
- Enter the information to be used as retrieval criteria in the appropriate field (s). If you prefer to see a list of all Time Sheet, leave all fields blank
- Click on the Find icon

The Time Sheet screen includes the following fields:
Field | Definition |
Employee | The person responsible for completing the job task |
Employee Assignment | The work task assigned to an employee |
| Fiscal Year | Lists all fiscal years in which a time sheet can be recorded |
Pay Code | Lists all the different types of pay that have their own unique pay schedule |
Pay Period | Defines pay schedules |
| Time Record Load Date | Describes the date the time record was accessed |
| Time Sheet Source | Describes the source of the time record |
| Time Attendance Status | used to represent the settings for Time and Attendance assigned to a particular employee's assignment |
| Total Regular Time | Sum of Regular Hours Approved |
| Total Overtime Hours | Sum of Overtime Hours Approved |
| Created Employee | Created employee number. |
| Approved Employee | Approved employee number. |
Create a Time Sheet
To CREATE a Time Sheet that records the start and end time of tasks and durations, follow the steps below:
Navigation
By default, you will be in Search Mode.
1. Click on the New icon ![]() . You will then be in Insert Mode.
. You will then be in Insert Mode.
2. Enter the new Time Sheet information. Fields with an asterisk  are mandatory fields.
3. The Employee will be generated automatically by the system, based on the user.
4. To enter the Employee Assignment, if required, click on the Lookup icon  , click on Find icon
  to retrieve the Employee Assignment list, then select the Employee Assignment. Once the Employee Assignment is selected a Shift Schedule text box comes down to enter the shift. Refer to Employee Assignment for more information.
5. Choose the Fiscal Year, Pay Code and the Pay Period from the drop down menus.
6. Input the Time Record Load Date using the calendar ![]()
7. Select the Time Sheet Source and the Time Attendance Status from the drop down menus as required.
8. To view more details about the Created Employee field, click on the details icon  .
.
9. Click on the Save icon  at the bottom to save your new Time Sheet information. A window will appear to confirm the new Time Sheet creation. Click OK to confirm.
Note: This will create the Time Sheet. To Submit the Time Sheet you must change the Transition Status, which appears as a drop box at the top of the form after the Time Sheet is saved:

Modify a Time Sheet
A Time Sheet can only be modified if the status is Created. Once it has been submitted for approval it can no longer be modified by the user.
To MODIFY a Time Sheet that records the start and end time of tasks and duration, follow the steps below:
Navigation
By default, you will be in Search Mode.
- Enter the information to be used as retrieval criteria in the appropriate field (s). If you prefer to see a list of all Time Sheets, leave all fields blank.
- Click on the Find icon
 .
. - Click on the Time Sheet you want to modify.
You will then be in Update/Delete Mode. - Make the necessary modifications. To add or remove an Employee Assignment, refer to Employee Assignment.
- Click on the Update icon
 at the bottom of the screen to save your modifications. A window will appear to confirm the modification. Click OK to confirm.
Leave Request
Overview
Leave Requests are used to organize and control all types of leaves that employees can take within an organization.
The manager approves a variety of Leave requests sent by his employees, like Sick Leave, Maternity Leave and Vacation Leave.
To approve a Leave Request:
Option 1:
Go to Human Resources > Employee Management > Leave Management > Leave Request
1. Click on the Find  icon.
icon.
2. Select a Leave request with a status of Approval Requested from the list. Note. The user`s number matches the manager`s number. Example: The Leave Request from Riley Smith1 will be assigned to Manager Jordan Tremblay1 and the Leave Request from Riley Smith2 will be assigned to Manager Jordan Tremblay2.
3. Select Approve from the Transition drop down menu
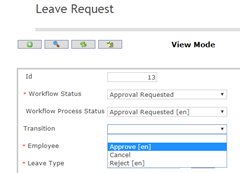
4. Click on the Transition  icon. A new window will appear.
5. Click on the Finish icon.
icon.
6. A message will confirm that the Workflow Transition has been Executed.
7. Click OK.
Option 2:
1. Go to Internal Message  section at the right side of the main screen.
2. The Leave Request will be accessed by clicking on the Green  dot.
dot.
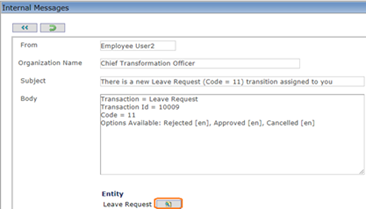
3. Accessing the Leave Request by clicking on the Update Domain  icon beside the Leave Request.
4. The window will display the Record waiting for an action.
5. Select Approve from the Transition drop down menu.
6. Click on the Transition  icon. A new window will appear.
7. Click on the Finish  icon.
icon.
8. A message will confirm that the Workflow Transition has been Executed.
9. Click OK.
Example:
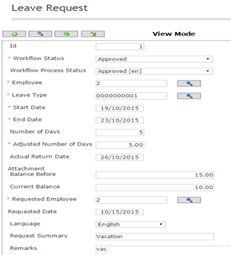
Option 3:
1. Click on the Dashboard  icon that is located on the right side panel of the main screen.
2. The window will display the Record waiting for an action.

3. Click on Leave Request button 
4. Another window will display more details on the request.
5. On the stage section, select Approval requested stage. The list will display all the leave request pending for your approval.
6. Click on the Update  icon. A new window will display the Leave Request form.
7. Select Approve from the Transition drop down list.
8. Click on the Transition  icon. A new window will appear.
9. Click on the Finish  icon.
icon.
10. A message will confirm that the Workflow Transition has been Executed.
11. Click OK.
Cancel a leave request
Cancel a leave request
To cancel a new leave request that’s has just been created
Go to Menu -> Employee Self Service -> Forms and Requests -> Leave Request
1. Click on the New  icon. The Employee Number will be populated automatically by the system.
2. Click on the Lookup  icon to select the Leave Type. Example: Annual Leave
3. Enter the Start and End Dates.
Notes
o The Number of Days will automatically display. The Length of leave will display also.
o The system will display the Balance Before and the Current Balance at the moment of the request. The Current Balance will be updated ONLY once the request is Saved.
4. Click on the Save  icon.
icon.
5. The request Workflow Process Status is set to Created.
6. To Cancel the Leave Request, select Cancel from the Transition drop down list.
7. Click on the Transition  icon. A new window will appear.
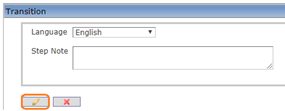
8. Click on the Finish  icon.
icon.
9. A message will confirm that the Workflow Transition has been Executed. As soon as the transition is performed, the Workflow Process Status is set to Cancelled.
To cancel a leave request that’s has been already sent to the manager for approval
Go to Menu -> Self Service -> Forms and Request -> Leave Request
1. Click on the Find  icon.
icon.
2. Select the Leave Request to cancelled.
3. Click on the hyperlink of the Leave Request on Approval Requested status workflow.
4. Go to the Transition field at top of the Form, select Cancel from the drop down list.
5. Click on the Transition  icon. A new window will display.

6. Click on the Finish  icon.
icon.
7. A message will confirm that the Workflow Transition has been Executed. As soon as the transition is performed, the Workflow Process Status is set to Cancelled.
Example:

Create a Leave Request
To CREATE a Leave Request follow the steps below:
Navigation
By default, you will be in Search Mode.
1. Click on the New icon ![]() . You will then be in Insert Mode.
. You will then be in Insert Mode.
2. Enter the new Leave Request information. Fields with an asterisk  are mandatory fields.
3. The Id will be generated automatically.
4. The Employee will be generated automatically, based on the user.
5. To enter the Leave Type, if required, click on the Lookup icon  , click on the Find icon
  to retrieve the Leave Types list, then select the Leave Type.
6. Input the Start Date, the End Date using the calendar ![]()
7. The Status will be generated automatically as Created.
9. The Requested Employee will be generated automatically, based on the user.
11. The Requested Date will be automatically filled by the system, its usually filled with the same date the information for the Leave Request is saved.
12. Choose the Language from the drop down menu.
13. Enter the Request Summary, which is a short description on the leave request.
14. Click on the Save icon  at the bottom to save your new Leave Request information. A window will appear to confirm the new Time Sheet creation. Click OK to confirm.

15. After the Leave Request is Created it must be Submitted. The user may also cancel the request before it has been submitted. A transition drop box will appear at the top of the form:

16. Select Request for Approval to submit the form. A confirmation box will appear:
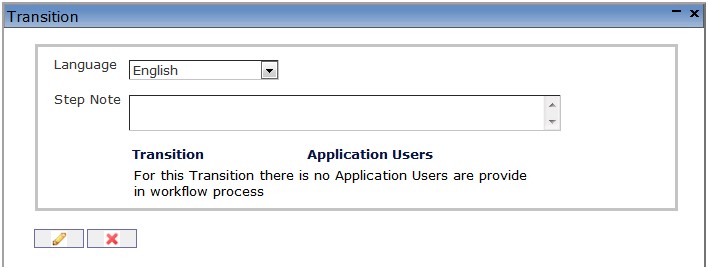
17. Enter a note in the Step Note section and click on the Finish  icon
icon
18. A message will appear:
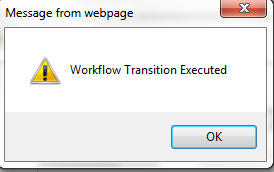
Fields
The Leave Request screen includes the following fields:
Field | Definition |
ID | Unique Leave request identifier generated by the system. |
| Employee | Employee ID of the person requesting the leave. |
| Leave Type | Type of requested leave. Defined as Leave Types |
| Start Date | Requested start date for the leave to start. |
| End Date | Requested end date for the leave to end. |
| Adjusted Number of Days | Number of leave days from start to end. |
| Actual Return Date | Requested date to return or end leave. This field is used if actual return date is different from the requested end date. |
| Status | Leave approval status. Status are: 1. Created 2. Approval Requested. 3. Approved by Supervisor 4. Approved 5. Rejected 6. Canceled |
| Requested Employee | Employee ID of the person requesting the leave will be displayed. |
| Requested Date | Date leave was requested. |
Language | Language used. |
| Request Summary | Short text on the leave request. |
| Create Temporary Position | Create a temporary. |
| Leave Request Required Documents Tab | This tab used to attach and validate the required document for the leave request. |
Request 1 week vacation
The Employee can easily request his own Vacation Leave via self-service
Note. Assumption: the Employee gets his or her annual vacation entitlement at the beginning calendar year.
The Employee is entitled to 15 days per calendar year.
To Request a week vacation
Go to Menu > Employee Self Service > Forms and Requests > Leave Request
1. Click on the New icon. The Employee Number will be populated automatically by the system.
2. To select the Leave Type click on the Lookup  icon.
icon.
3. Click on the Find  icon.
icon.
4. Select the Annual Leave
5. Enter the Start Date, example 1/2/2019
6. Enter the End Date, example: 9/2/2019
Notes.
o The Number of Days and the Length of leave will be automatically displayed.
o The system will display the Balance Before and the Current Balance at the moment of the request. The Current Balance will be updated ONLY once the request is Saved.
o When the employee requests one week of vacation, the system will keep track of the balance of his remaining vacation.
7. Click on the Save  icon.
icon.
8. Go to the Transition field at top of the Form, click on Request Approval. (Do not select the option Cancel at this stage).
9. Click on the Transition  icon. A new window will appear.

10. Click on the Finish  icon. A message will confirm that the Workflow Transition has been Executed.
11. Click OK. As soon as the transition is performed, the workflow will transition to Approval Requested.
Example:
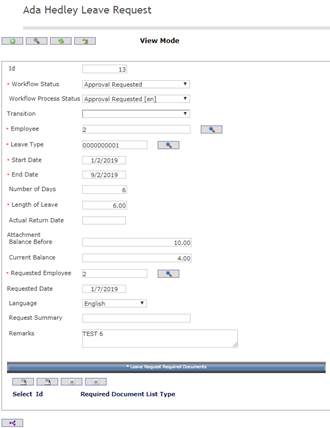

Note. The direct manager will receive an Internal Message prompting him to take action. Once the manager approves the leave request, the Employee will receive an Internal Message stating that his vacation has been approved.
Modify a Leave Request
A Leave Request can only be modified if the status is Created. Once it has been submitted for approval it can no longer be modified by the user.
Navigation 
By default, you will be in Search Mode.
- Enter the information to be used as retrieval criteria in the appropriate field (s). If you prefer to see a list of all Leave Requests, leave all fields blank.
- Click on the Find icon
 .
. - Click on the Leave Request you want to modify.
You will then be in Update/Delete Mode. - Make the necessary modifications.
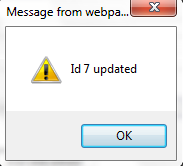
- Click on the Update icon
 at the bottom of the screen to save your modifications. A window will appear to confirm the modification. Click OK to confirm.
Travel Request
Overview
The user can review, fill out and submit travel requests for Business Trips. The user can also see other employee's going on the same Business Trip.
Navigation
How to SEARCH:
- Enter the information to be used as retrieval criteria in the appropriate field (s). If you prefer to see a list of all Travel Requests, leave all fields blank
- Click on the Find icon

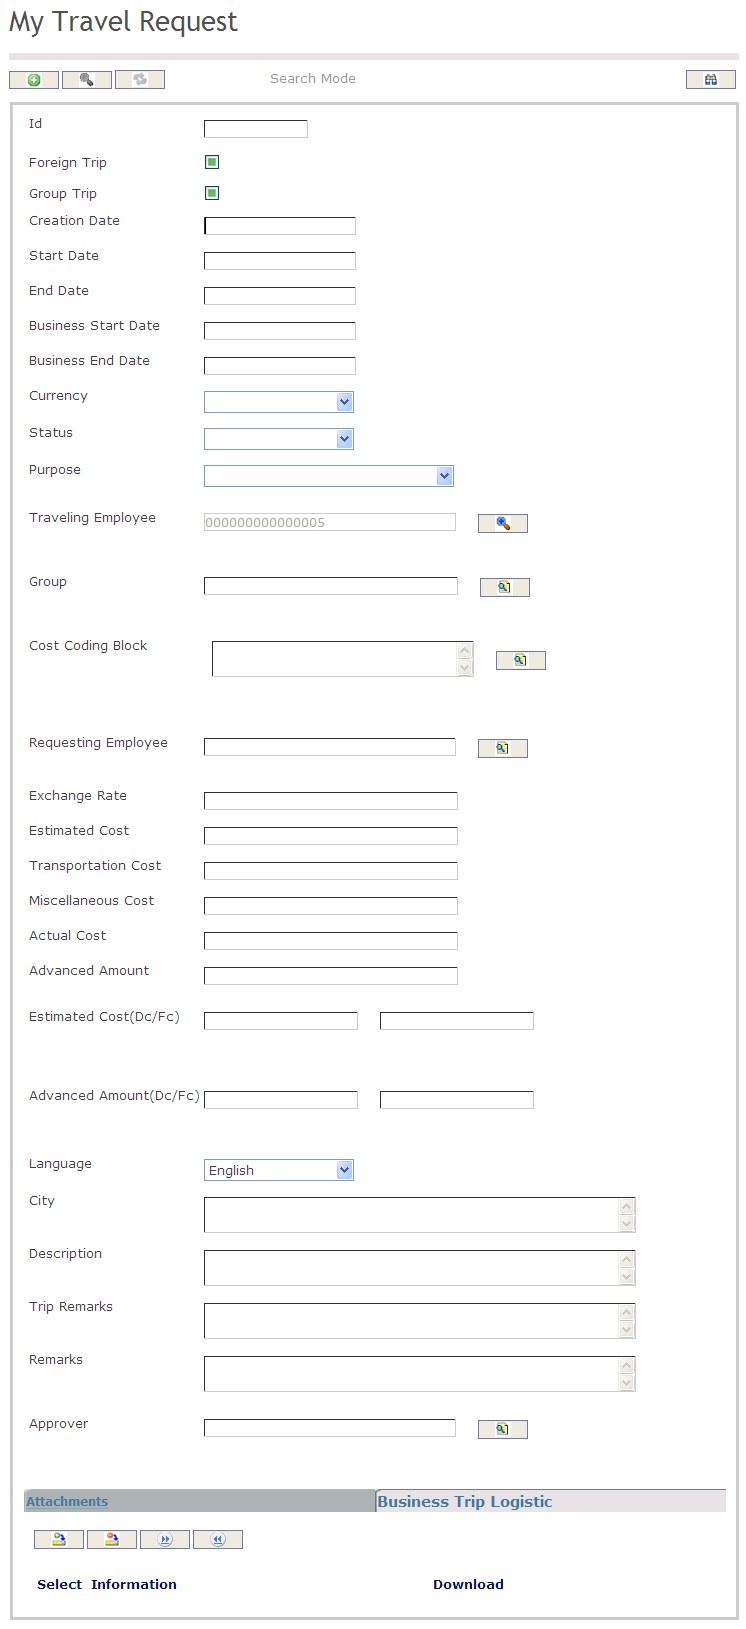
The Travel Request screen includes the following fields:
Field | Definition |
Foreign Trip | Identifies if the trip is outside the country |
Group Trip | Identifies if this trip will be attended by one or by multiple parties |
| Creation Date | Date Travel Request is created |
| Start Date | Start Date of trip (departure date) |
| End Date | End Date of trip (return date) |
| Business Start Date | Date Business Trip intended event starts |
| Business End Date | Date Business Trip intended event ends |
Currency | Contains the central repository for all currencies used throughout the system |
| Status | Status of Travel Request |
Purpose | Describes the purpose of the business trip |
Traveling Employee | The employee leaving on a business trip |
| Group | Select group if applicable |
Cost Coding Block | This entity has the information of every coding block with the structure (number of elements and order of concepts) of the Group |
Requesting Employee | The employee requesting the business trip |
| Exchange Rate | Exchange rate of destination |
Estimated Cost | The estimated cost (budget) for the trip |
| Transportation Cost | Indicates cost related to transportation |
Miscellaneous Cost | Indicates any miscellaneous amounts |
Actual Cost | The actual total cost of the trip |
Advanced Amount | Indicates the advanced funds amount the employee is requesting in order to undertake the trip |
| Actual Cost (Dc/Fc) | Actual cost |
| Language | Language Used |
| City | City of business trip |
| Description | Description of trip |
Trip Remarks | Provides for a brief remark on the trip outside of the trip description |
| Remarks | Other remarks |
| Approver | Trip approver |
| Attachments | Attachments related to trip |
| Business Trip Logistic | Business Trip logistic records |
Create Travel Request
To CREATE a Travel Request follow the steps below:
Navigation
By default, you will be in Search Mode.
1. Click on the New icon ![]() . You will then be in Insert Mode.
. You will then be in Insert Mode.
2. Enter the new Travel Request information. Fields with an asterisk  are mandatory fields.
3. The Creation date will be generated automatically.
4. Check the Foreign Trip box if the trip is outside the country and check box the Group Trip if more than one person is attending the trip.
- Foreign Trip: Identifies if the trip is outside the country
- Group Trip: Identifies if this trip will be attended by one or by multiple parties
5. Input the Start Date, End Date, , Business Start Date, Business End Date using the calendar ![]()
6. Choose the Currency as required from the drop down menu
7. Choose the Purpose for the business trip from the drop down menu
- Purpose: Identifies the purpose of the trip
8. To enter the Traveling Employee, click on the Lookup icon  , click on Find icon
  to retrieve the Employee list, then select the Employee. To view more details about the Traveling Employee click on the Details
  button.
9. To enter the Group, click on the Lookup icon  , click on Find icon
  to retrieve the Business Trip Group list, then select the Business Trip Group. To view more details about the Group click on the Details
  button.
10. To enter the Cost Coding Block click on New ![]() or click on the Lookup icon
or click on the Lookup icon  , click on Find icon
  to retrieve the Cost Coding Block list, then select the Cost Coding Element. To view more details about the Cost Coding Block click on the Details
  button.
11. To view more details about the Requesting Employee click on the Details  button.
12. Enter the Estimated Cost, Transportation Cost, Miscellaneous Cost, Actual Cost, Advanced Amount, Estimated Cost(Dc/Fc), and the Advanced Amount(Dc/Fc).
- Estimated Cost: The estimated cost (budget) for the trip
- Miscellaneous Cost: Indicates any miscellaneous amounts
- Actual Cost: The actual total cost of the trip
- Advanced Amount: Indicates the advanced funds amount the employee is requesting in order to undertake the trip
13. Choose the desired Language from the drop down menu.
14. Enter the City, Description, and any Trip Remarks in the fields provided.
- Trip Remarks: Provides for a brief remark on the trip outside of the trip description
15. Click on the New icon  under
under  to enter the Attachments (refer to Attachments for more information).
16. Click on the Save and Return icon  to save the Attachments information and return to the Business Trip screen, or click on the Discard icon
  to discard the Attachments entry and return to the Business Trip.
17. Click the individual Select Checkbox (es), under  to select and de-select the Attachment (s), as required, or click the Select All icon
  or Unselect All
  icon, to select or de-select all Attachments, if required.
18. Click the Remove icon  to remove the selected Attachment, if required.
19. Click on the New icon  under
under  to enter the Business Trip Logistic (refer to Business Logistic for more information).
20. Click on the Save and Return icon  to save the Business Trip Logistic information and return to the Business Trip screen, or click on the Discard icon
  to discard the Business Trip Logistic entry and return to the Business Trip.
21. Click the individual Select Checkbox (es), under  to select and de-select the Attachment (s), as required, or click the Select All icon
  or Unselect All
  icon, to select or de-select all Attachments, if required.
22. Click the Remove icon  to remove the selected Business Trip Logistic, if required.
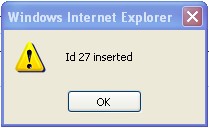
23. Click on the Save icon  at the bottom of the Business Trip page to save your new Business Trip information. A window will appear to confirm.
Jobs
Internal Job Board
Overview
Through the internal job board screen, employees can view jobs which have been posted internally within the organization. This screen provides the user with the compatibility to search for the jobs which they want to apply for, as well as submit an application for that specific position internally through the company. The screen includes important information such as the end date for the internal job posting, the position title the employee is interested in, the institution the position is based, and the recruiter responsible for hiring for that position.
Navigation
Human Resources ► Employee Self Service ► Jobs ► Internal Job Board
Internal Job Board screen fields
| Fields | Description |
| Institution | Institution loockup filter for search Internal Jobs. |
| Position | Position loockup filter for search Internal Jobs. |
Interview Appointment
Overview
This screen contains interview assignments for an interview by employees. The interview appointment is used for any employee who interviews a candidate to enter the interview evaluations, score and comments from the interview.
Navigation 
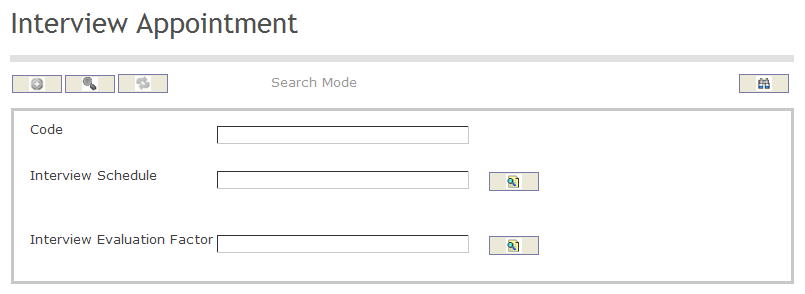
How to SEARCH:
- Enter the information to be used as retrieval criteria in the appropriate field (s). If you prefer to see a list of all Applications, leave all fields blank.
- Click on the Find icon
 .
.
The Interview Appointment screen includes the following fields:
| Report Fields | Definition |
| Code | Unique code to identify an assignment for an interview to an interviewer. The code should be auto-generated. |
| Interview Schedule | The interview schedule for each applicant of a recruitment project. |
| Interview Evaluation Factor | Total score from the interviewer for this interview. |
My Applications
Overview
This screen provides an employee with the option of viewing the positions which they have already applied for, as well as updating themselves on the status of the application.
Navigation 
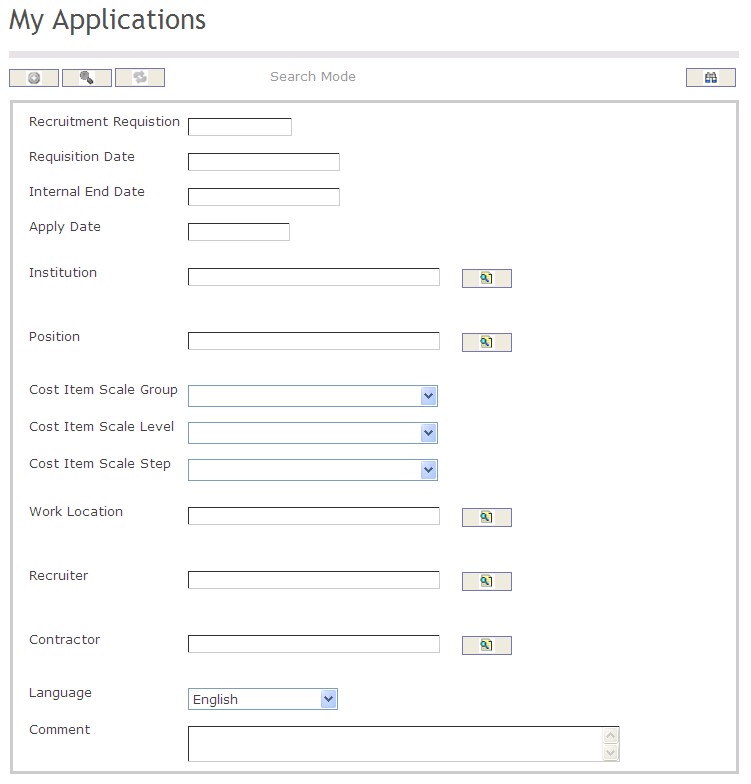
How to SEARCH:
- Enter the information to be used as retrieval criteria in the appropriate field (s). If you prefer to see a list of all Applications, leave all fields blank.
- Click on the Find icon
 .
.
The My Application screen includes the following fields:
| Report Fields | Description |
| Recruitment Requisition | Unique code of the recruitment requisition |
| Requisition Date | The date the requisition was created |
| Internal End Date | The date that the internal job posting ends |
| Apply Date | The date that the internal job posting was applied on |
| Institution | The institution of the internal job |
| Position | The position of the internal job |
| Cost Item Scale Group | These fields contain information about the non-salary scale bonuses that will be used in the cost item scale |
| Cost Item Scale Level | Level information associated to the Cost Item Scale of the position |
| Cost Item Scale Step | Step information associated to the Cost Item Scale Level of the position |
| Work Location | The location that the position is situated |
| Recruiter | The recruiter in charge of the internal job |
| Contractor | The contractor in charge of the internal job |
| Language | Language used |
| Comment | Any additional comments regarding the internal job |
Establishment
Organization Chart
Overview
When accessing this option, the user can view the hierarchy for government wide organizations as maintained by the government (e.g. public service commission). Hierarchies can be viewed on:
- Organizations
- Generic Positions
- Employee Positions
The user is able to navigate within each of these hierarchies. When in a hierarchy, the user has the option to navigate into one of the other two hierarchies based on the linked relationship between the organization, the employee positions within that organization, and the generic positions underlying the employee position.
In addition, the user can see basic employee contact information on employees who are working within a specific organizational unit.
Navigation 

Search for organization units by selecting the drop-down menu to the left of the organization chart function. Examples include organizations, generic positions, and employee positions. However, any type of organization can be created in the Institution screen in the Admin module.
By clicking the  icon, the user can select a hierarchy to display from the organization unit which has been selected from the drop-down menu.
The hierarchy will display on the same screen when all fields have been selected as follows:
*Note: This is an example illustration; created with an institution name. Specific employee names and position names are not displayed.
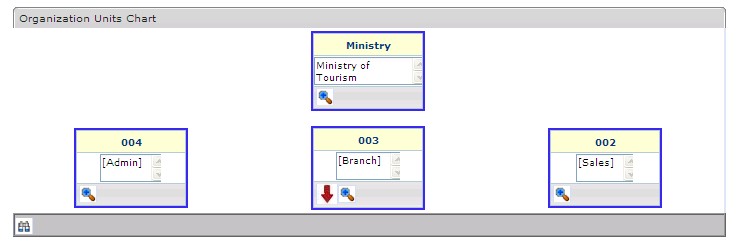
By clicking on the  icon, the hierarchy will be displayed further down the hierarchical tree for the user, and will appear as follows:
*Note: This is an example illustration; created with an institution name. The specific employee names and position names are not displayed due to confidentiality.
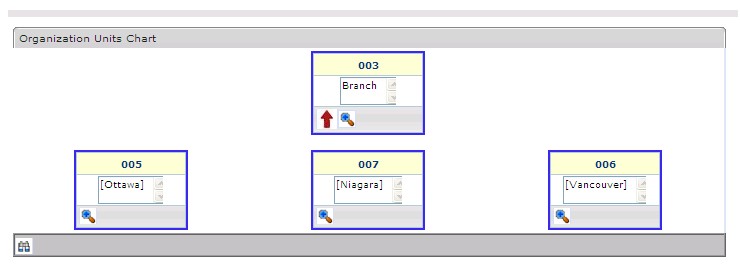
Employee Search
Overview
The employee search screen is used to perform a search for a specific employee within an organization.
Navigation 
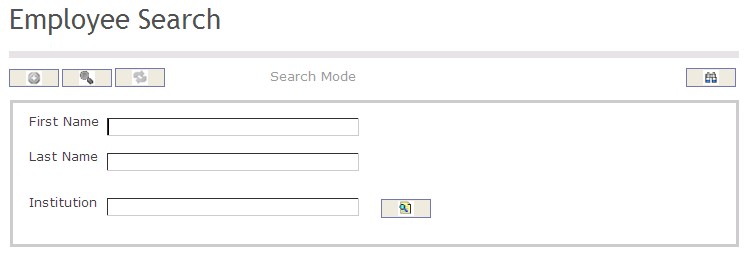
How to SEARCH:
- Enter the information to be used as retrieval criteria in the appropriate field (s). If you prefer to see a list of all Employees, leave all fields blank.
- Click on the Find icon
 .
.
The Employee Search screen includes the following fields:
| Report Fields | Description |
| First Name | Employee's first name |
| Last Name | Employee's last name |
| Institution | The organization that the employee works |