Employee
To view the employee’s profile
Go to Human Resources > Employee Management > Employee
1. In the Employee window, click on the Find  icon to do a general search.
2. Click on one of the employee listed. Example:

3. The manager can now view the employee information.
4. Select the Tabs at the bottom of the screen see the information related to each of them.
To view the Employee Assignment
Go to: Human Resources > Employee Management > Assignment Management > Employee Assignment
- Click on the Find
 icon to do a general search. The engine will bring up all employee assignments that are current and past. Example:

- Click on the hyperlink, example

- You can view the employee assignment details, like
a. Employee Assignment Id
b. Employee Institution
c. Employee Position
d. Situation Code Combination (type of employment conditions)
e. Shift Schedule
f. Pay Code, etc.
Example:

Note. The manager has limited access to view the records, so he cannot update nor change the information contained on the Employee and Employee Assignment Forms.
Employment History
Overview
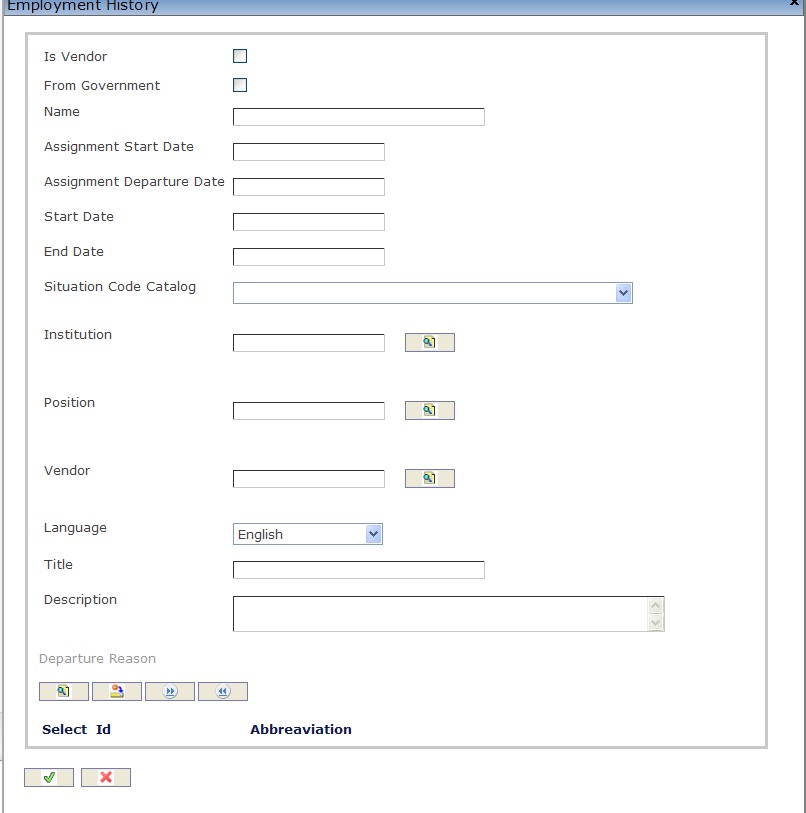
This screen describes the employment history of employee. An employee can have many employments. Employments can occur within the government as well as outside of government.
Navigation  click the New icon
 under
under  .
.

Create Employment History
1. Enter the new Employment History information. Fields with an asterisk  are mandatory fields.
2. Check the Is Vendor and From Government checkboxes, if required. By Default - these checkboxes are not selected.
- Is Vendor: If checked, the employer is a known vendor to the government.
- From Government: If checked, the employment history information originates from the government.
3. Enter Assignment Start Date, Assignment Departure Date, Start Date and End Date if required.
- Assignment Start Date: Start date of the assignment.
- Assignment Departure Date: Date the employee left the assignment.
- Start Date: Start date the employee worked for the employer other than government.
- End Date: Date the employee left the employer other than government.
4. Choose the Situation Code Catalogue from the Drop Down Menu.
- Situation Code Catalogue: Identifies the employment situation such as full time, part time from prior Assignments.
5. To enter the Institution, click on the Lookup icon  , click on Find icon
  to retrieve the Institution list, then select the appropriate Institution.
6. To enter the Position, click on the Lookup icon  , click on Find icon
  to retrieve the Position list, then select the appropriate Position.
7. To enter the Vendor, click on the Lookup icon  , click on Find icon
  to retrieve the Vendor list, then select the appropriate Vendor.
- Institution: Institution .
- Position: Employee Position.
- Vendor: A recognized place of work other than the government.
8. Choose Language from Drop Down Menu, if required.
9. Enter the Title and Description.
- Title: Title of position the employee was in.
- Description: Explanatory notes on what the employee did at this position.
To ADD a Departure Reason:
1. Click on the Lookup icon  under
under and click on the Find icon
  to retrieve the Departure Reason list, then select the appropriate Departure Reason.
2. Click the individual Select Checkbox (es), under to select and de-select the Departure Reason(s), as required, or click the Select All icon
  or Un-select All
  icon, to select or de-select all Departure Reason(s), if required.
3. Click the Remove icon  to remove the selected Departure Reason(s), if required.
4. Repeat steps 1 to 3 as required for all Payment Locations.
Click on the Save and Return icon  to save the Employment History information and return to the Employee screen, or click on the Discard icon
  to discard the Employment History entry and return to the Employee screen.
Medical Form
Navigation  click the New icon
 under
under  .
.

Create a Medical Form
1. Enter the new Medical Form information. Fields with an asterisk  are mandatory fields.
2. Enter Code.
- Code: Numerical Code of medical form.
3. Choose the Language from the Drop Down Menu.
- Language: Language as chosen.
4. Enter Name and Instruction.
- Name: The name of the form.
- Instruction: Instructions on how to use the form; its intended purpose.
5. Enter Medical Examination Date.
- Medical Examination Date: Date of medical examination
6. Choose Marital Status from the Drop Down Menu.
- Marital Status: Marital Status.
7. Enter the Number of Dependents.
- Number of Dependents: Number of individuals the employee is responsible for.
8. Enter the Family Medical History, Personal Medical History and General Note if required.
- Family Medical History: Family medical history information.
- Personal Medical History: Personal medical history information.
- General Note: General commentary.
- Medical Expiry Date: Date the medical form will expire. This field will only be for viewing purposes. The value in this field will be determined automatically.
To ADD a Contact:
1. Click on the Contact tab, , Contact New icon
 and enter the new Contact information (refer to Contact for more information).
Any Information under the Medical Condition tab, , is being automatically retrieved from the Medical Catalogue function. Refer to Medical Catalogue for more details.
2. Click the individual Select Checkbox(es), under the Contact tab, , to select and de-select the Contact information, or click the Select All icon
  or Un-select All
  icon, to select or de-select all the Contact information, if required.
3. Click the Remove icon  to remove the selected Contact information, if required.
4. Repeat steps 1 to 3 as required for each tab.
Click on the Save and Return icon  to save the Medical Form and return to the Employee screen, or click on the Discard icon
  to discard the Medical Form entry and return to the Employee screen.
Note
Navigation (From  click the New icon
 under
under  ).
).

Create a Note
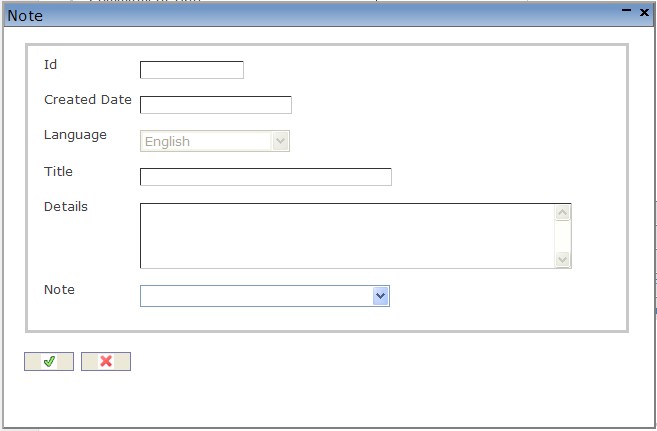
1. Enter the new Note information. Fields with an asterisk  are mandatory fields.
2. Enter ID.
- ID: Note identification number.
3. Created Date: Date the note is created - is system generated.
4. Choose Language from Drop Down Menu if required.
- Language: Language as chosen.
5. Enter Title and Details.
- Title: Title of note.
- Details: "notepad" for HR to write comments about the employee/employee file.
6. Choose Note from Drop Down Menu.
- Note: Type of note to select from the Drop Down Menu.
7. To ADD an Attachment, click on the New icon ![]() and enter the Attachment information. Refer to Attachments for more details.
and enter the Attachment information. Refer to Attachments for more details.
Click on the Save and Return icon  to save the Note information and return to the Employee screen, or click on the Discard icon
  to discard the Note information and return to the Employee screen.
Payment Information
Navigation (From  click the New icon
 under
under  ).
).

Create Payment Information
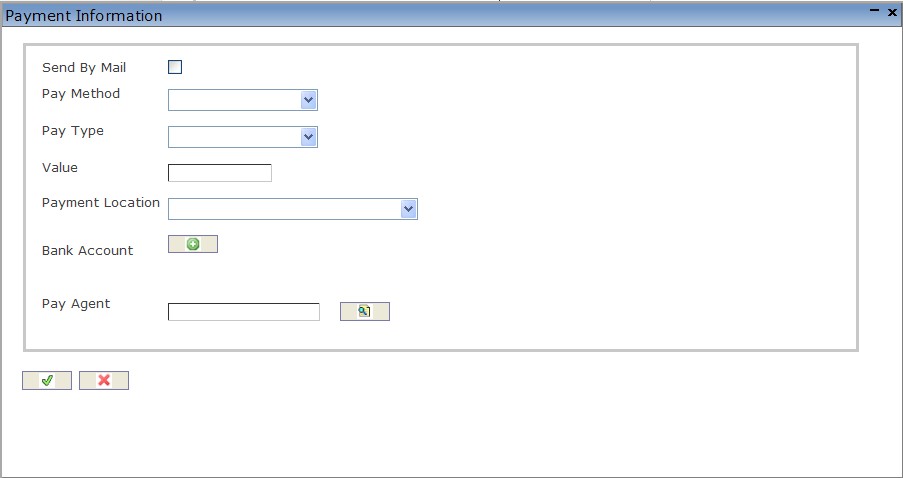
1. Enter the new Payment Information. Fields with an asterisk  are mandatory fields.
2. Check the Send by Mail checkbox if required. By Default - Send by Mail checkbox is not checked.
3. Choose the Pay Method from the Drop Down Menu. Depending on the Pay Method chosen, different fields will appear.
- Pay Method: Method of Payment
4. Choose the Pay Type.
- Pay Type: PERCENT - Percent of pay to receive.AMOUNT - Amount of pay to receive.BALANCE - The balance of pay.
- If payment is not split into 2, Balance should be selected. A value is only entered if you want a fixed amount paid in a different manner.
4. Enter the Value if required.
- Value: The value of pay to received based on Pay Type.
. To enter a new Bank Account, click on the New icon ![]() and enter the required Bank Account Information. Refer to Bank Account for more details. The bank account information can only be entered if the pay method is Cash or Cheque
and enter the required Bank Account Information. Refer to Bank Account for more details. The bank account information can only be entered if the pay method is Cash or Cheque
6. To enter the Pay Agent, if required, click on the Lookup icon  , click on Find icon
  to retrieve the Pay Agent information, then select the Pay Agent.
Click on the Save and Return icon  to save the Payment Information and return to the Employee screen, or click on the Discard icon
  to discard the Payment Information entry and return to the Employee screen.
Bank Account
Navigation (From  click the New icon
  under
under  and then click on the New Bank Account icon
 ![]() ).
).


Create a Bank Account
1. Enter the new Bank Account information. Fields with an asterisk  are mandatory fields.
2. To enter the Financial Institution, click on the Lookup icon  , click on Find icon
  to retrieve the Financial Institution list, then select the appropriate Financial Institution.
- Financial Institution: Name of Financial Institution
3. Choose the Currency from the Drop Down Menu.
- Currency: The Currency the bank account will be registered with.
4. To enter the Offset Code, click on the Lookup icon  , click on Find icon
  to retrieve the Offset Code list, then select the appropriate Offset Code.
- Financial Institution: Name of Financial institution.
- Offset Code: Offset coding block.
5. Enter the Account Number, Iban, National Transfer Code and Bank Account Name if required.
- Account Number: Account number of bank account.
- Iban: The code used for verification of wire transfers.
- National Transfer Code: Universal transfer code for the bank account within the employee country.
- Bank Account Name: Name of the bank account.
6. Click on the Save and Return icon  to save the Bank Account information and return to the Employee screen, or click on the Discard icon
  to discard the Bank Account entry and return to the Employee screen.