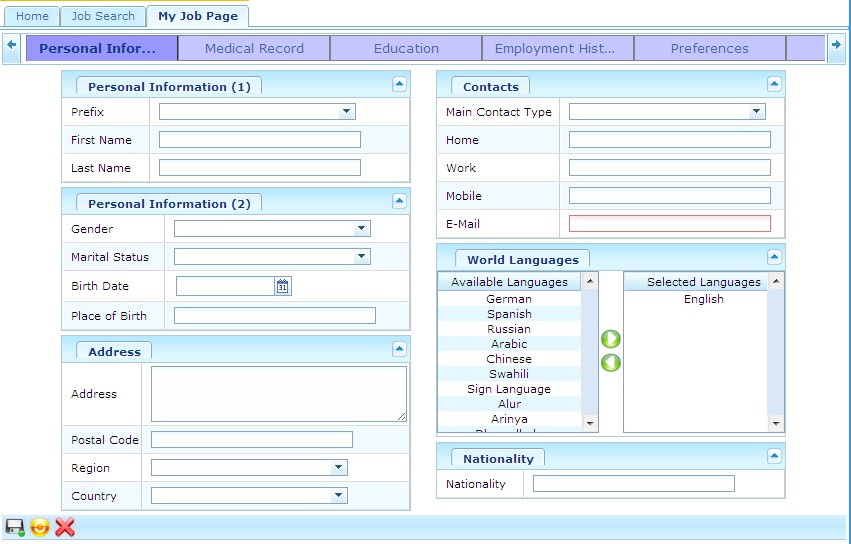
Entering Personal Information
Overview
This is where an applicant enters their personal information. This is part of the profile and will be used when applying to jobs.
Navigation
In the profile screen click on the  tab.
tab.

1. Select the Prefix from the drop down menu
- Prefix: Prefix to name of external applicant
2. The First Name and Last Name will be automatically generated. These will come from the user registration.
- First Name: first name of external applicant
- Last Name: last name of external applicant
3. Select the Gender and Marital Status from the drop down menus as required
- Gender: gender of the external applicant
- Marital Status: marital status of external applicant
4. Enter the Birth Date
- Birth Date: the date that the external applicant was born. To enter the date, click on the Calendar icon
 and select the date.
5. Enter Place of Birth, Address, and Postal Code as required
- Place of Birth: the location where the external applicant was born
- Address: the address of the external applicant
- Postal Code: the postal code of the external applicant
6. Select the Region and Country from the drop down menus
- Region: the region where the external applicant currently lives in
- Country: the country that the external applicant currently lives in
7. Select the Main Contact Type from the drop down menu
- Main Contact Type: is the main contact for the external applicant. Whatever type is chosen will become a mandatory field to be filled out.
8. Enter Home, Work, or Mobile contact information
- Home: phone number at the external applicants home
- Work: phone number at the external applicants work
- Mobile: mobile phone number of the external applicant
9. E-Mail will be automatically generated from the user registration
- E-Mail: email of the external applicant
10. The World Language will be automatically generated from the user registration. Click on the appropriate arrows to add or remove languages.
- World Language: the language used by the external applicant
11. Enter the Nationality
- Nationality: the nationality of the external applicant
12. Click on the save icon at the bottom of the screen. The following will appear.

